Editing the Profile Library
Add a Profile to the Profile Library

The Add quickly button will add a new profile to the active Value Table.
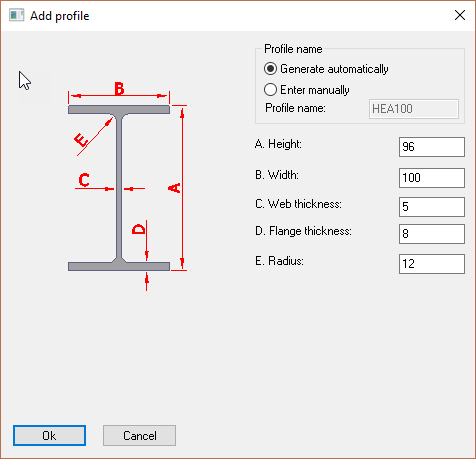
Profile name
The options are to Generate automatically or Enter manually.
Selecting 'Generate automatically' will automatically add the Type to the profile i.e. IPE. In this mode the Profile name window will be grayed out.
Selecting 'Enter manually' will allow the user to change the profile name manually.
By adding the relevant dimensions the new profile will be added to the active Value table.
Edit the Profile Library

Selecting this tool will bring up the Edit profile library dialog. At the top left of the dialog there are 2 tabs: Overview and Value tables
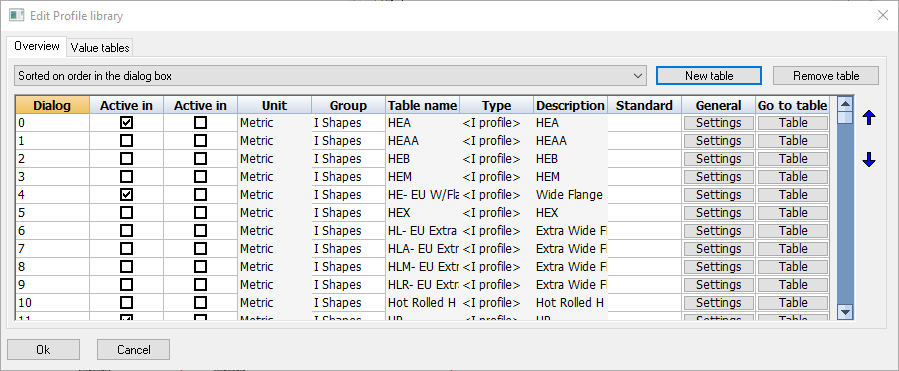
Overview tab
Selecting the Overview tab will show a table, wherein each row represents a profile table.
The purpose of each columns are explained below:
- Dialog priority - which establishes the order of the profile table in the Select profile dialog box. The lower the is value, the higher it will be listed in the Select profile dialog box.
- Active in Metric - If you are working on a Metric 3D drawing and this checkbox is activated, then this profile table which will become visible in the Select Profile dialog.
- Active in Imperial - If you are working on a Imperial 3D drawing and this checkbox is activated, then this profile table which will become visible in the Select Profile dialog.
- Units - Indicates whether the contents of the profiles table is in millimeters or in inches
- Group name - Indicates which Group the row belongs to. Each group name represents a tab in the Select profile dialog box
- Table name - The table filename this profile group is linked to. You can find this filename in the folder : \Parabuild\Pb_Lib\Prof\
- Type - Refers to the section type that the profile table is using
- Description - Provides a description of the profile. This description is the name of the table as it is shown in the Select profile dialog box.
- Standard - Describes the international standards for the selected profile table
- General settings - Will bring up the Section Table Options dialog, whereby the user may modify general settings of the profile table.
- Go to Table - will take the user to the Value tables tab dialog, where all the contents and options of the table can be modified. See below.
Value tables tab
The Value tables will vary according to the profile Type, however, the first 4 columns are consistent for all Types:
- File name - is the file name for the table which has the suffix .pr which is stored in the folder : c:\parabuild\Pb_Lib\Prof\
- Sysname - The system name of the profile that Parabuild needs internally for the unique recognition of the profile. The value must not be one already used by another profile in the table. The prefix (name of the table) is put before this text to obtain the complete system name. This system name is usually not used in the bills of materials or dialog boxes: Parabuild uses this name internally only. This system name is required because Parabuild needs to have a unique name that is independent of the name of the profile in other languages.
- I/O - You can deactivate the individual profile so that it becomes invisible in the Select profile dialog box without having to remove it. Parabuild will nevertheless recognize the profile if it was drawn in a drawing. Therefore if you deactivate the profile here it only has influence on the Select profile dialog box.
- Name - The name of the profile that Parabuild uses everywhere for identification (dialog boxes, bill of materials, shop drawings …)
All columns that follow hereafter are columns that define the dimensions of the profile (height, width, thickness,…). These columns can differ depending on the type of section that was chosen for the table.