Creating smart structure objects
The Parabuild structure objects are considered single-part objects.
But the structure is actually just a block reference, and the collection of the objects inside the block is considered to be a single part by Parabuild.
We can however make the objects inside the block smart, so that they can change size as if it were a modifiable library part.
We can use a table that drives the variables of a macro inside the structure.
The goal of this topic is to create a structure who's size can be easily changed.
In the default Parabuild Stair command, the treads are such structures that are modifiable by the end-user.
To create a smart structure, the following procedure should be followed.
We are assuming that you start from within a drawing that will use the smart structure. So in the case of the stair, we are starting with the stair template drawing that contains the stair stringers, and to which an array of tread structures should be added.
1. Create a structure
Draw at least 1 object and 1 macro, and constrain it to the World coordinate system.
When that is done, Create a Structure of your objects and include the macro inside the structure.
The structure contents does not need to be finished when you create the structure as it can be modified afterwards.
2. Edit the structure
Use the REFEDIT commands to edit the block of the structure if needed. Do not use the BEDIT command, as the World coordinate system is not shown when using this command.
You can modify the macro or add objects to the structure at this point.
While editing the structure afterwards, it may be possible that your macro is not visible anymore.
The macro is still there, but Parabuild automatically hides it because it would clutter the drawing too much.
You can resolve this by simply starting the Edit Macro command and select one of the parts. This command will find and open the macro that owns the object.
3. Constrain the structure with a positioning macro
Close the REFEDIT if the command is still active.
Now create a new macro, and use it to position the structure. You can constrain to any object that Parabuild recognizes inside the structure such as lines, planes, plates and profiles.
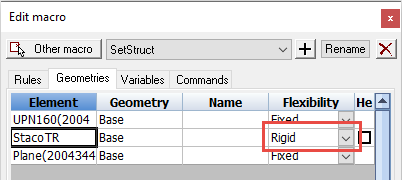
Be sure to set the flexibility type of the structure to Rigid in the module that positions the structure.
Due to the design of a structure, a structure can never be set as Flexible in modules. We can only modify a structure with REFEDIT.
In the example of the stair template, this is a single macro per tread that positions the tread.
There is also an array object that arrays this macro together with the tread, but that is specific to the stair template.
4. Create a table for the structure and set it in the owning module
Open the General macro settings dialog of the positioning macro.
Navigate to the Module properties tab, and select the module that positions the structure. In the stair template example, this module is called SetStruct. To be clear, the owning module is the module that has the structure set as Rigid.
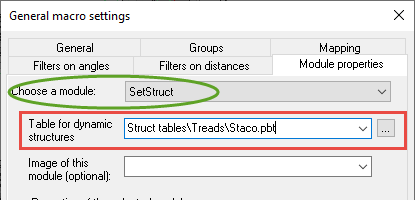
Click on the button  for creating or editing a dynamic structure.
If the field is empty, then a new table will be created and the filename location will be asked.
We recommend storing it in the Struct tables folder, and creating your own folder(s) there.
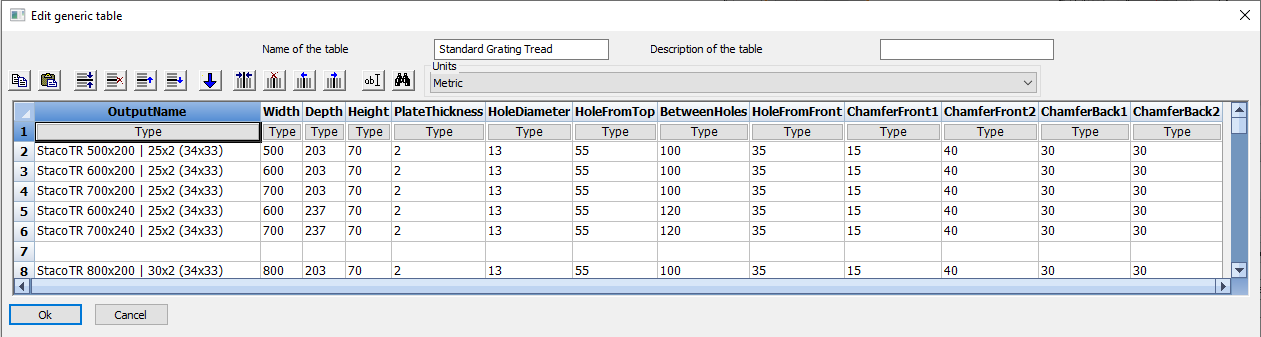
The table itself should contain at least 2 columns for it to work :
- The OutputName column, which contains the name of the structure for the Bill of Materials. The type of this column needs to be String.
- At least one column that has the same name as a variable in a macro inside the structure. You can have as many of these variable columns as needed. The type of these columns needs to be Distance or Angle in degrees.
So in this table, each row represents a variation of the structure. The variable values will drive the changes to the structure.
So whenever the user chooses a different variant of the structure (end-users will only see the OutputName), Parabuild opens the block, applies the new variable values to the macro inside the block and saves the block again. All of the references of the block will show the change.
5. Letting the end-user choose a variant of the structure
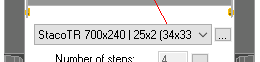
The only way (at the time of writing) to let the end-user change the size of the structure, is to add the dropdown list to an image dialog of the macro.
So in the dialog for the module that positions the structure, we can add a control type Switch structure and optionally also the Structure advanced button :
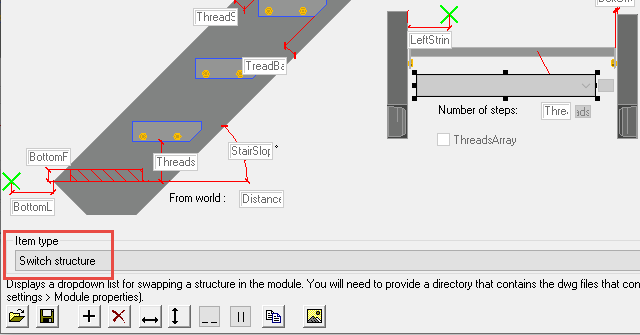
The structure advanced button will allow the end-user to choose a different table or to modify the table, so that they can add more size variants of the structure. It also allows swapping for a different structure, this is explained below.
This method works simply by the presence of a rigid structure inside the module. So we are assuming that a dialog tab can only have 1 modifiable structure.
That is everything we need to do to make the structure modifiable.
6. Making the structure swap-able (optional)
This capability is optional.
With swapping the structure, we mean that the structure could be swapped for a different one entirely. This new structure would come from a different dwg file.
To make the swapping work successfully, the 'handles' of the structure need to be numbered with a reference index in both structures (in the old and in the new structure)
The 'handles' are the objects that were used to position the structure.
In the case of the stair template, these 10 plane objects are the handles :
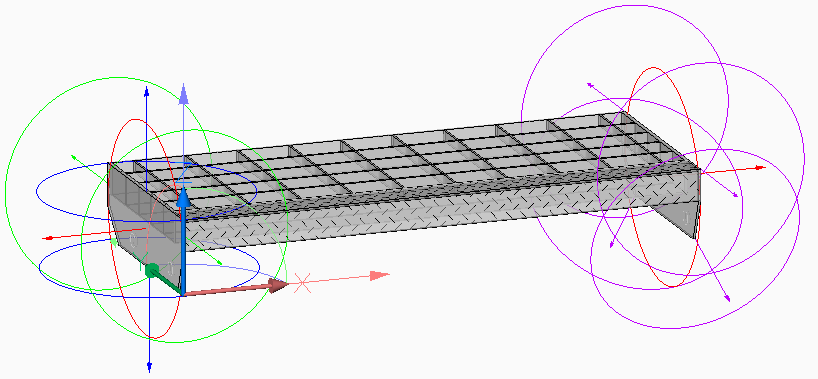
By only using these planes in the macro that positions the structure, the other objects do not really matter and can be anything else.
So the only purpose of these 10 plane objects is to support structure swapping.
It is possible to directly use the plates or profiles to position the structure, but then the swapping will fail if the new structure does not have a plate with number 'x'. There must be the same type of object behind each structure reference index number in both structures.
The objects inside both the old and the new structure need to be numbered with a reference index. This is especially necessary for the 'handle' objects.
When the structure is swapped, Parabuild will remap the constraints that were set on 'Object 0' in the old structure to the 'Object 0' in the new structure. By doing this with all the constraints to the old structure, the structure will be swapped and the old structure is removed.
The object reference indexes can be changed with the command PrB_SetStructRefIndexes.
This command should be called while the structure is being edited with the REFEDIT command.
This will number the objects, the first object getting number 0, the second gets number 1, etc..
The current structure reference index of an object will be displayed when using the LIST command on the object.
This will display on the command line : Struct Reference Index : x.