User Shortcuts
Command name : PrB_UserShortcuts
User Shortcuts is a tool that facilitates customization by reducing the amount of code and knowledge needed to add small automating functions for Parabuild. It offers an easy start to the new Parabuild programming API. It provides a quick way to further automate repetitive actions specific to your workflows, without the hassle of entering commands or creating dialog boxes or menu buttons.
Some examples are :
- It may serve to replace a Parabuild command that asks too many questions to the drafter. You may want the shortcut to draw a part in a certain way with certain properties pre-set without asking the drafter too many questions.
- When 2 or more actions are often done together by the drafter, we can combine both actions in 1 shortcut to reduce clicks for the drafter.
- The shortcut could simply start an AutoCAD or Parabuild command for which you do not have or want to have an icon on your screen.
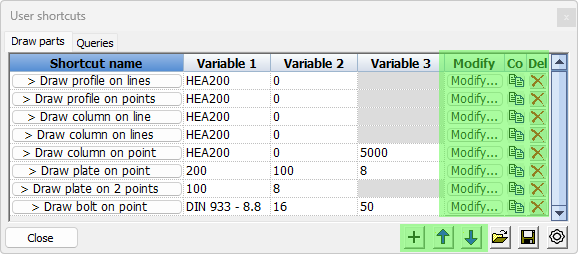
The user shortcuts dialog with the by default included shortcut examples looks like this :
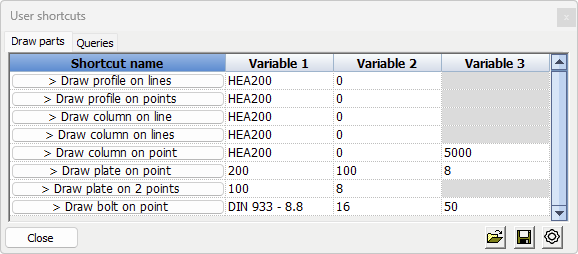
Each button in this dialog can have Lisp code snippets behind them that leverage the Parabuild API and standard AutoCAD/BricsCAD features.
Move the cursor over a button or over a variable to see a tooltip that explains the purpose of the shortcut or what the input of a variable should be : 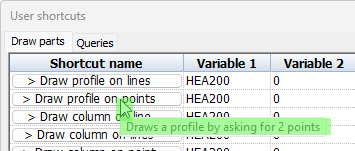
The tool has so many possible uses that it is best to explain this through the example shortcuts that are included by default :
Draw profile on lines - This shortcut will first ask you to select model lines, and then it will draw a profile on each line with the section and rotation chosen in variable 1 and 2. Afterwards, the dialog box for doing further changes to the new profile placements is opened.
Draw column on lines - This will do the same as Draw profile on lines but it will also immediately assign the structural type Column (member) to the new profiles that are created.
Assembly weight (under the Queries tab) - This will ask you to select a part, and will then display the total weight of the part's assembly in the Variable 1 field of the dialog itself.
Notice the different ways in which the properties for the new parts can be handled :
- Asked as input on the command line
- As a variable in the shortcut dialog, allowing us to set a default value there
- A fixed value stored inside the shortcut, which is un-modifiable unless the shortcut itself is being edited
Creating or Modifying user shortcuts
Clicking on the cogwheel  in the bottom of the user shortcuts dialog will add controls to the dialog so that customization becomes possible :
The usual modifications for copying, deleting of the shortcuts are self evident.
The sorting buttons  will not only sort the shortcuts, but they can also sort the tabs themselves. If you would move the top shortcut up, this would move the entire tab one spot to the left. By moving the bottom shortcut down, this would move the entire tab one spot to the right. In other words: the position of the first shortcut of each tab determines the ordering of the tabs.
We will explain the dialog box behind the creation and modification of a user shortcut :

Unique name for this shortcut - This unique name is needed for the identification of the user shortcut only. It is used only to identify this specific shortcut. In the background a new lisp function will be automatically created for this shortcut when needed, and it's name will contain this identifier.
Shortcut label to be shown in dialog box - This the name of the shortcut as it should be displayed in the Shortcut name column of the User shortcut dialog.
Group name for the tab in the dialog box - This is the tab name that should be used to display this shortcut in. Simply entering a different group name will cause the creation of a new tab :
Description to be shown in the tooltip - This is the text that should be displayed in the tool tip when the cursor moves over the shortcut button
Hide this shortcut in the shortcuts dialog box - When this is enabled then the shortcut will not display in the regular mode of the User shortcut dialog. It is here so that you can hide shortcuts without having to delete them.
Is valid in metric drawings - Enable this to make the shortcut available in all metric drawings
Is valid in imperial drawings - Enable this to make the shortcut available in all imperial drawings
Lisp or command line code - This box needs to contain the Lisp code that should be executed when the user shortcut is executed. All standard AutoLisp functions can be used, as well as those in the Parabuild API.
There are numerous websites and forums that can help you learn Lisp. Some examples :
The example user shortcuts that come pre-installed can also serve as examples for you to learn how to prompt the drafter for objects or points, do changes to objects or create new ones, calculate changes to points, and call Parabuild API functions to perform certain actions.
A full list of all available Parabuild Lisp function with instructions can be found in the Programming API for Lisp and C++ topic.
Variables necessary for the code
This spreadsheet allows us to choose as many variables as needed for input or output of the lisp code.
The variables will each appear in a column in the User shortcut dialog, and input variables can be modified by the user so that the new value will be used for subsequent shortcut executions.
Each variable has the following properties :
Variable name - This is the variable name that you have to use in the Lisp code. This variable name will also appear in the tooltip when you hover over this variable field in the User shortcut dialog box. The User shortcut dialog displays the variable columns header by the number only, because each shortcut can have a different amount and purpose for each variable.
Variable value in metric - The value that you enter here will be the default value presented for this variable in all metric drawings. When the user changes this value, then the value will remain the user's value throughout the session. This value is only valid for input variables.
Variable value in inches - The value that you enter here will be the default value presented for this variable in all inches drawings. When the user changes this value, then the value will remain the user's value throughout the session. This value is only valid for input variables.
Set value as string - When this checkbox is enabled then Parabuild will handle the input and/or output of this variable in the lisp code as a string. Otherwise, it will treat it as a numeric value.
Variable is user input - When this checkbox is enabled then the variable will be passed to the shortcut code with this value. This is intended for settings that are not always fixed for the shortcut.
Variable is user output - When this checkbox is enabled then the value that the lisp code has put into this variable will be fed back into the User shortcut dialog box after the completion of the lisp code. This is useful for displaying relevant results (eg information when querying the model, or number of parts created, etc...)