Using variables to do changes to objects and constraints
The following manipulations can be done with variables inside a module and gives the macro designer a lot more flexibility.
We can trigger big behavioral changes to a constraint, to an object, or to the entire module if the correct procedures explained here are followed.
Disabling a module
Modules can now be disabled through the variable name PbDisableModule in the module that needs to be disabled
When this variable's value is set to 1, then the entire module will be disabled, which means :
- All of the flexible entities of the module will be set to construction geometry.
- Flexible bolts will be set as construction geometry and their holes will be removed.
- Cuts that are drawn with macro cuts will be removed but the cut constraint itself is preserved so that the cut can still be restored later on.
When the value is set to 0, the disable action will be undone.
The PbDisableModule variable can be a user adjustable or flexible variable.
We can use equations to let a module disable or enable itself based on a certain geometric condition.
Parabuild will watch for the value of the PbDisableModule variable, and will enable or disable the parts in the module at the right time during calculation of the macro.
Note When an object is attached to an assembly and disabled and then enabled again, then this tool will attach it back to that same assembly.
However to make the attach to assembly restore work it is required that the object is attached to a main object that is constrained in the module that contains the disabled object.
One could simply add a dummy distance variable on the main object to add it to the module as a fixed object.
The Get_ method to retrieve values from otherwise unattainable sources
The Get_ method for variables allows us to fill the variable with values coming from a certain source that are otherwise more work or impossible to retrieve.
As soon as a variable starts with Get_ in it's name then the variable gets a completely different approach by the module.
Right before the module is being calculated these variables will already be filled with the value that you specified through the variable name.
The name of the variable will influence the value retrieval. The format for the variable name is as follows :
Get_ModuleName_Prof/Struct/Bolt/Pattern/Cut/Array_VarName
The above 3 methods can all be combined in this order except for Prof/Struct/Bolt/Pattern/Cut/Array only one of them can be used in a variable name.
The module name and Prof/Struct/Bolt/Pattern/Cut/Array are optional.
Each part of the formatting options are explained below :
- ModuleName (replace this with an actual module name)
Enter the module name here to retrieve a value from another module
This method can be combined with the below methods Prof, Struct, Bolt and Varname
For this to work correctly the specified module needs to be calculated before the current module. The constrainer is responsible for checking this before using this method. - Prof
Adding the prof syntax will allow us to either retrieve a variable from the section table directly by specifying the column name as the VarName, or we can retrieve a profile placement variable. See the Feeding excel values topic to know which variable names are available for profile placements. If a profile placement name is not provided then there is no way to be sure which profile the data is retrieved from if the module contains more than 1 flexible profile. - Struct
Adding the struct syntax will allow us to retrieve a variable from the macro(s) inside the structure that is rigid in the module.
It is recommended to have just 1 rigid structure in the module when using this method. - Bolt
Adding the bolt syntax will allow us to either retrieve a variable from the bolt module itself such as diameter or hole offset, but also bolt pattern variables.
When the module contains several bolt patterns then it is recommended to also add the pattern name just before the variable name and also seperated with a _
All the available bolt and pattern variables can be found in the Feeding excel values topic. - Array
Adding the Array syntax will allow us to either retrieve a variable from the array or an entry of the array.
A condition is that this variable should be created in a module of an entry macro of the array, or the main macro of an array. The array can then be found through the macro-array relation.
The main macro is the macro that constrains the common base geometry that all entry macros depend on.
The array name should not be used in the variable name when get_Array is used within an entry macro.
It is possible to target individual entry macro settings when you use the syntax like this : Array_Arrayname_0_UserEntrySize. This would change the user distance override of the first macro entry. Targetting entry macro settings that change the entry macro positions should not be done from within an entry macro itself, but rather from within the main macro. It is also possible to use the syntaxes Array_Arrayname_first_UserEntrySize and Array_Arrayname_last_UserEntrySize
It is possible to retrieve the index of an entry macro from within the entry macro itself using the syntax : get_Array_EntryIndex.
All the available array variables can be found in the Feeding excel values topic. - VarName
The variable name can be any variable name of the other module or any of the variables that are explained in the Feeding excel values topic.
The variable needs to be assigned as a User adjustable variable either visible or invisible.
If this variable is set to flexible then the entire mechanism will not work.
That is because the method of this tool circumvents the geometry calculation by setting the value right before the module is calculated.
The value is retrieved from either static data such as section tables, or from other modules that have already been calculated prior to this module.
The Sync_ method to change values of otherwise unattainable sources
The sync method follows the exact same logic as the Get_ method but with this method we can change a variable's value.
The procedure for using the Sync_ method is exactly the same as the Get_ method, but the Sync_ variable can be flexible as well.
This means that we can use equations to force a certain value to the variable that we are targeting.
Modifying the enumeration/direction of constraints through equations
It is possible to influence the direction enumeration of constraints using variables and equations
This allows us to switch the direction of a plane without having to resort to an angle constraint or extra helper geometry.
To retrieve or change this enumeration value we have to create a variable of which the name is composed like this :
get_VariableName_EnumName or get_ContraintId_EnumName
or
sync_VariableName_EnumName or sync_ConstraintId_EnumName
We explain the different parts of the name :
- get_ : When you use get_ then the value of the enumeration will be filled in this variable by Parabuild. You should use an Adjustable or Fixed variable in this case, NOT a Flexible variable. The value will be filled in by Parabuild just before the module is calculated.
- sync_ : When you use sync_ then the value of the variable will be used to change the enumeration of the constraint . You should use a Flexible variable in this case, NOT an Adjustable or Fixed variable. The value will be filled in by Parabuild just before the module is calculated, and during calculation of the module this variable's value is calculated and pushed into the enumeration of the constraint which can directly influence the geometry.
- VariableName : the variable name in case you want to target a distance constraint
- ConstraintId : the constraint id that you want to target. This works on all constraints. The constraint id always remains stable except when constraints are deleted at which time the id might be reused for a new constraint. The constraint Id is listed in the rules tab (see image below)
- EnumName : The name of the enumeration which can be determined by moving the cursor over the enum buttons. This name depends on the constraint type and also on the geometry that was selected during creation of the constraint.
We explain the new mechanism with the help of an example that changes the inside/outside enumeration of the chirality constraint in this image :

To change the enumeration we need to know a few things about the constraint. They are highlighted in the image :
- The Id number of the constraint. The constraint name such as the distance name can also be used but some constraints do not have a name, in which case we need the id number. The Id of a constraint is always displayed in the edit macro dialog box.
- The enumeration name as well as the value that you want to set. If you move the mouse over the enumeration button it will show the enum name and value of that button.
To influence the above chirality constraint the variable name and equation would look like this :
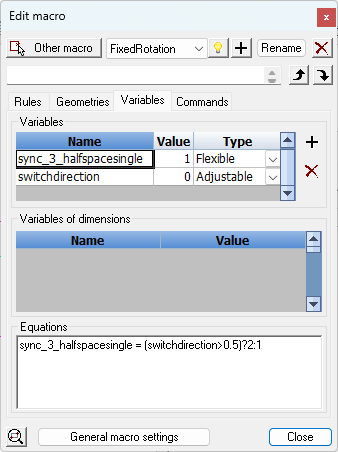
As you can see, we are using an equation to expose the enumeration to the user using the switchdirection variable which responds to 0 and 1 for a checkbox.
Note that the value of a distance constraint enumeration can range from 1 through 4.