Object Filters
The purpose of filters is to identify specific objects in the model based on a set of rules.
The structural types rely on these filters to classify objects, but that is not the only use case for filters.
Filters can also be used in general to find certain types of parts.
The CNC contour settings for example also use filters to assign different contour options to the type of part.
Filters can use the part properties and even geometrical traits as condition for passing the filter.
The filters modification dialog can be accessed from the Parabuild Settings command.

We will explore all the different options in this dialog box :
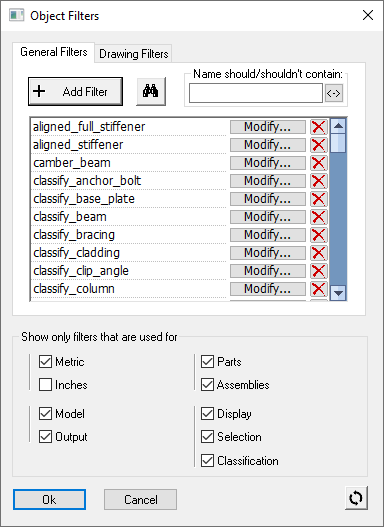
General Filters -
Drawing Filters -
Add filters - Click this button to add a new filter to the list
Name should/shouldn't contain - Start type letters or words, and the list of filter will be reduced. Only those filters that contains (or do not contain) your text string will be shown
Listbox that lists all the filters - Each row contains a filter. Use the modify and delete button to apply a change to the filter
Show only filters that are used for - Use these check-boxes to reduce the number of filters on the list, by only showing the filters with a particular purpose.
 This button will reset all of the filters to the Parabuild 'factory defaults'
Configuring a filter
This dialog is accessible from the Filters dialog, when modifying a single filter.
We will explore all the different options in this dialog box :
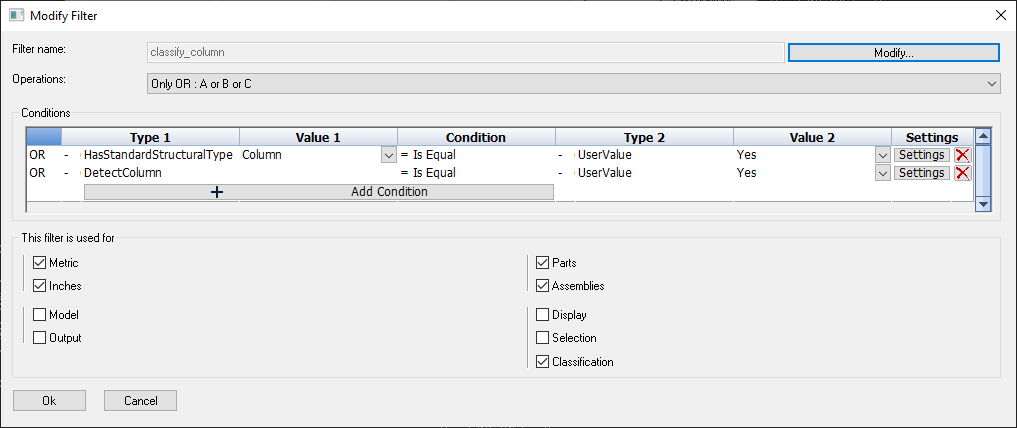
Filter name - This is the unique name for the filter, which is used throughout Parabuild to identify this filter
Operations - This option has an influence on the conditions in the dialog. It has the following options
- Only OR - If any of the conditions match, then the filter passes
- Only AND - If all of the conditions match, then the filter passes
- Primary OR - The matching principle of the conditions can be arranged in groups. An example of this operation type is :
A AND (B OR C), where A, B and C are conditions. Once this option is enabled, the condition list below changes so that you can add or remove conditions to each group, or add groups. - Primary AND - The matching principle of the conditions can be arranged in groups. An example of this operation type is :
A OR (B AND C), where A, B and C are conditions. Once this option is enabled, the condition list below changes so that you can add or remove conditions to each group, or add groups.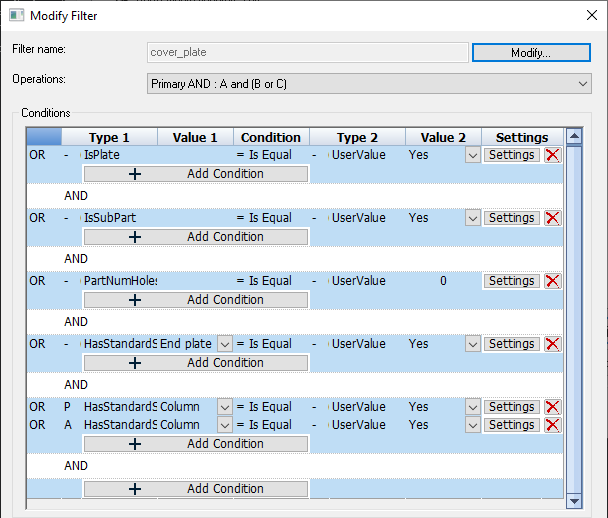
An example filter that uses the more advanced condition arrangement
Conditions - This list contains a row per condition. It lists the conditions that need to pass in order for the filter to pass. Use the Add condition button below each group to add conditions.
- Operator (first column) - This column shows what the operator is within the group of the condition. It is informative but it can be changed by changing the operations (explained above).
- Type 1 - The condition type can be anything from a property, a geometrical trait, a formula or another filter.
This column also contains the Redirection (None/Main Part/Assembly) just before the type itself. By specifying the redirection, we can better target the type of value that needs to be retrieved.
To better explain the redirection consider the following example : When the condition type is Weight, should that be the weight of the main part or the weight of the entire assembly? - Value 1 - This is used in some cases in addition to the condition type.
This value will be adjustable only when the property needs an additional value.
The type HasStandardStructuralType is such a type that needs an additional value :
- Condition - The condition is the comparison that needs to be performed between the value of Type 1 and the value of Type 2.
For many condition types this can only be equal or not equal.
But for a condition type such as Weight, this can also be Larger than or Smaller than.
For condition types that can contain strings such as Material, other comparisons become useful such as Starts with, Ends with, Contains or Does not contain.
Only the comparisons that are compatible with Type 1 will be shown. - Type 2 - This condition type is very much dependent on the type that was set in Type 1.
When Type 1 is IsPlate, then the available options in Type 2 will only be UserValue.
However when Type 1 is Material, then the Type 2 is not limited, because the Material is a string that can be compared to any other type.
The redirection is also available for Type 2, see Type 1 to learn what it does. - Value 2 - The availability of this value field depends on both Type 1 and Type 2.
When Type 1 is IsPlate, then the available options in Value 2 will only be Yes or No.
However when Type 2 is Formula, then you can enter the actual formula here. - Settings - The settings of a condition allows you to change the following options for the condition :
Case sensitive for strings - whether string comparisons should be case sensitive or not
Tolerance for decimal value - the tolerance to be used when comparing 2 decimal values
This filter is used for - By enabling or disabling these check-boxes, you can influence in which circumstances the filter will be used throughout Parabuild and the user interface of Parabuild.
- Metric / Inches - Use the filter on drawings in Metric, in Inches or both units.
- Model / Output - Whether the filter should be used for 3D modeling and/or output generation
- Parts / Assemblies - Whether the filter should be used on single parts, assemblies or both
- Display / Selection / Classification - Whether the filter should be for user interface display tools, for the section of objects, or for the classification of structural types (or a combination of these)
Note : For very complex filters it is recommended to split them up into multiple sub-filters and then combine them into the final filter.
This will improve readability and the re-use of filters.