Draw Section
Command - (Prb_TagGroup "View Annotation")
This command will do different things depending on the space in which you start it :
- If you start this command from the 3D model, then it will create a new camera.
- If you start this command from a 2D sheet, then it will draw a new section view together with a camera in 3D. The new section view is connected to the new camera because the camera defines the viewpoint of the view.
The first point that you indicate will become the center of the camera.
The second point will determine the viewing direction as well as the depth of the view limitation.
Drawing the camera in the 3D model
The command will ask for two points, as indicated in the illustration :
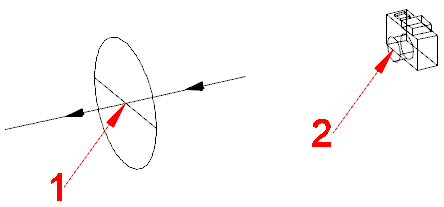
The center location (1) and the viewpoint location (2) of the camera as it is drawn in the 3D model.
Drawing a section view on a sheet
On the command line, the first question question is asked :
Select the center location for the camera, or <Enter> to select an alignment geometry or [Settings]:
By pressing <Enter> you can select an oblique line anywhere on a view to align the new section to.
By pressing <S> the Annotation styles and groups dialog will be opened.
If you follow suit the command allows you to indicate two points on an existing sheet.
You should indicate the first and second point as in the illustration :
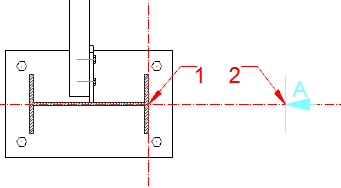
Where to indicate the center location (1) and the viewpoint location (2) for the new view in 2D.
The distance between point 1 and 2 will also be the front and back limitation of the new camera.
Once the 2 points are chosen, you will see the dialog for the settings for the new view(s) and afterwards you will be able to choose the location of each new view.
This procedure is exactly the same as see we refer you to the Add New GA views topic for more information about this dialog.