
Using variables to retrieve data or modify objects from within a module
The following manipulations can be done with variables inside a module and gives the macro designer a lot more flexibility.
We can trigger big behavioural changes to a constraint, to variables, to an equation, to an object, or to the entire module if the correct procedures explained below are followed.
Disabling a module
Modules can be disabled through the variable name PbDisableModule in the module that needs to be disabled.
When this variable's value is set to 1, then the entire module will be disabled, which means :
- All of the flexible entities of the module will be set to construction geometry.
- Flexible bolts will be set as construction geometry and their holes will be removed.
- Cuts that are drawn with macro cuts will be removed but the cut constraint itself is preserved so that the cut can still be restored later on.
When the value is set to 0, the disable action will be undone.
The PbDisableModule variable can be a user adjustable or flexible variable.
We can use equations to let a module disable or enable itself based on a certain geometric condition.
Parabuild will watch for the value of the PbDisableModule variable, and will enable or disable the parts in the module at the right time during calculation of the macro.
Note When an object is attached to an assembly and disabled and then enabled again, then this tool will attach it back to that same assembly.
However to make the attach to assembly restore work it is required that the object is attached to a main object that is constrained in the module that contains the disabled object.
One could simply add a dummy distance constraint on the main object to add it to the module as a fixed object.
The Get_ and Sync_methods to retrieve or set values from other modules, profiles, structures, bolts, cuts, and arrays
The Get_ and Sync_ method for variables allows us to fill the variable with values coming from a certain source that are otherwise more work or impossible to retrieve.
The name of the variable will influence the value retrieval.
As soon as a variable starts with Get_ or Sync_ in it's name then the variable will be approached completely different by the module.
For the Get_ variables, right before the module is being calculated these variables will already be filled with the value that you specified through the variable name (if you follow the below rules correctly).
The Get_ variable needs to be assigned as a User adjustable variable either visible or invisible.
The sync method follows the exact same logic as the Get_ method but with this method we can change a variable's value rather than only retrieve it.
The procedure for using the Sync_ method is exactly the same as the Get_ method, but the Sync_ variable can be flexible as well.
This means that we can use equations to force a certain value to the variable that we are targeting.
The Sync_ variable needs to be assigned as a Fllexible variable either visible or invisible, if you want an equation to force a value on it. But it could as well be a User Adjustable variable if you want to give control of the value to the user in the Review Macro dialog box.
The Sync_ method is more limited and does not work on all the supported Get_ variable names. The supported ones are listed in the chapters below.
Why go this length with long variable names?
Macros are very powerful geometric and mathematical tools that do not need programming. But due to this, we are limited to variable names and equations to make them.
Using these variable names allows us to give any macro access to functions that would otherwise only be available through programming with API calls from Lisp or C++. It makes these macros even more capable all within the same dwg environment, without any need for programming.
The different data that can be retrieved or changed using the Get_ and Sync_ methods are listed below.
Retrieving variables values from other modules
This is the syntax of the variable name that should be used for retrieving variable values from another module within the same macro :
Get_ModuleName_VarName
Each part of the variable name is explained below :
- ModuleName (replace this with an actual module name)
Enter the module name here to retrieve a value from another module
For this to work correctly the specified module needs to be calculated before the current module. The constrainer is responsible for checking this before using this method.
Do not use spaces or other symbols in the module names, otherwise this feature will not work due to the variable name's limits. - VarName
The variable name can be any variable name of the other module or any of the variables that are explained in the Feeding excel values topic.
The variable needs to be assigned as a User adjustable variable either visible or invisible.
If this variable is set to flexible then the mechanism will not work.
That is because the method of this tool circumvents the geometry calculation by setting the value right before the module is calculated.
Retrieving or setting options in a profile module, querying and changing profile sections
This is the syntax of the variable name that should be used for querying or changing profile placement settings, or even querying or changing the section of a profile :
Get_(ModuleName)_Prof_(Groupname)_VarName
or
Sync_(ModuleName)_Prof_(Groupname)_VarName
The module name is optional.
Each part of the variable name is explained below :
- ModuleName (replace this with an actual module name)
This modulename can be omitted when you are querying or changing profile settings in the same module as this variable.
Enter the module name here to retrieve or set the value from another module
For this to work correctly the specified module needs to be calculated before the current module. The constrainer is responsible for checking this before using this method.
Do not use spaces or other symbols in the module names, otherwise this feature will not work due to the variable name's limits. - Prof
Adding the prof syntax will indicate to Parabuild that we want to retrieve a variable from the section table directly by specifying the column name as the VarName, or profile placement variables. - Groupname
This is optional and specifies the profile placement's name.
If a profile placement name is not provided then there is no way to be sure which profile the data is retrieved from if the module contains more than 1 flexible profile. But it will work reliable if the module contains just 1 rigid profile.
A profile placement's name (often called groupname) can be reviewed or changed with the command PrB_GroupName and then selecting the profile itself. - VarName
The supported variable names are listed below
Supported Profile placement variables
In the Feeding excel values topic you can look up the purpose of each variable name that is available for profile placements.
Example finished profile placement variables : Get_Prof_Height and Sync_Prof_RotationAngleDegrees
Note To support backwards compatibility, it is allowed to omit the get_ and use a variable name like Prof_Thickness. This is only the case for profile variables and not for other get_ methods in the other chapters.
The following variable names are supported here : Height, Width, Thickness, WebThickness, FlangeThickness, RotationAngleRadians, RotationAngleDegrees, ReversePath, SectionOffset, SectionOffsetType, MorphAlignment, MorphStartSectionOffset, and MorphEndSectionOffset.
The following variable names are not supported here because they use text strings : SectionName, SectionOffsetTypeName, MorphEndSectionName. These variables can still be used for Feeding excel values or with the GetProperty and SetProperty functions in the C++/Lisp API.
Using Sync_ to modify the profile's position and rotation is only supported for these variables : RotationAngleRadians, RotationAngleDegrees, ReversePath, SectionOffset, SectionOffsetType, MorphAlignment, MorphStartSectionOffset, and MorphEndSectionOffset
Note that Height, Width, Thickness, WebThickness, and FlangeThickness are not listed in the Feeding excel values topic because they only support read-only, and the excel feeding system does write-only. These 5 variables are calculated based on the 2D section of the profile and are not retrieved from the section table of the profile. The advantage of using these 5 variables is that they will work on any Custom-section profile that does not have a section table.
Supported section table variables (and changing the profile's section size)
We can also access all the column names of the section table : 
This will work on any profile that is part of a section table. Spaces should be replaced with an _ in the variable name.
Example finished section table variable : Get_Prof_Web_Height2
Using Sync_ is also supported on section table variables and this will trigger a section change of the rigid profile.
It is advised to have enough variables that are matching with columns in the section table, so that Parabuild does not have multiple valid section rows in the table to choose from. You wouldn't know which section row Parabuild would pick.
Example of changing section size
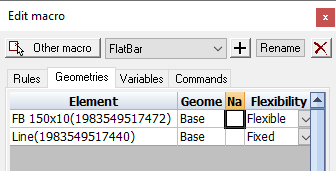
To illustrate how this should be done, we're showing an example of a simple macro that contains 1 profile module.
The module just contains 1 Profile placement for a flat bar :
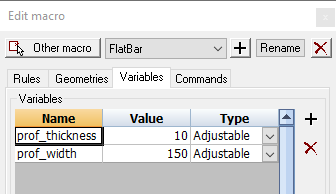
In the variables tab 2 variables were created which would be the minimum to determine the section size of a flat bar.
We have chosen for user adjustable variables, but these could as well be flexible variables that are set by equations or other rules.
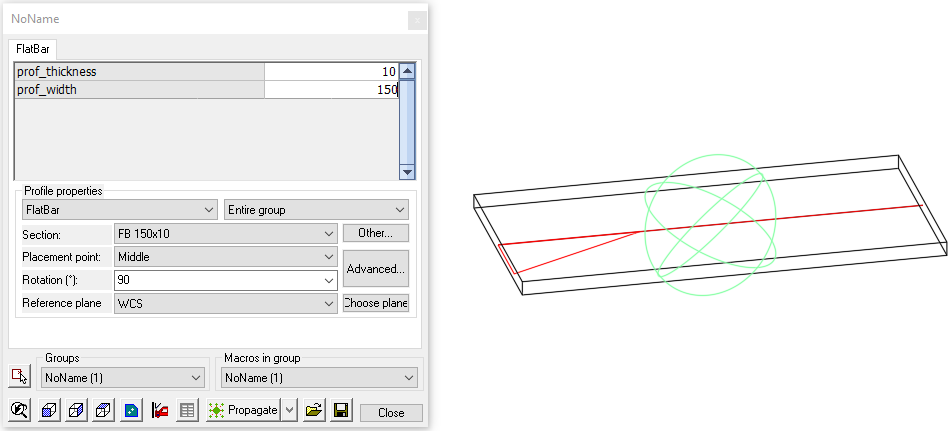
In this example we start off with a thickness of 10 and width of 150 :
And this is what happens when we change prof_width variable to 300 :
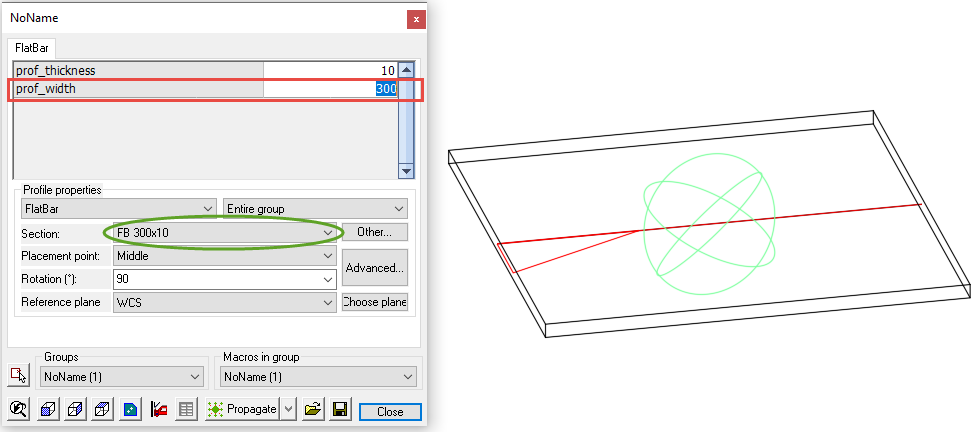
This is the result after changing the prof_width variable to 300. As the 300x10 section exists, the macro has switched the section automatically.
If the section with the chosen sizes does not exist in the tables, then the closest matching section size will be chosen.
Minimum and maximum
It is possible to not specify an exact size, but minima and maxima for the sizes.
The only change we need to apply is to use Prof_Min and/or Prof_Max in the variable names (or get_Prof_Min and get_Prof_Max).
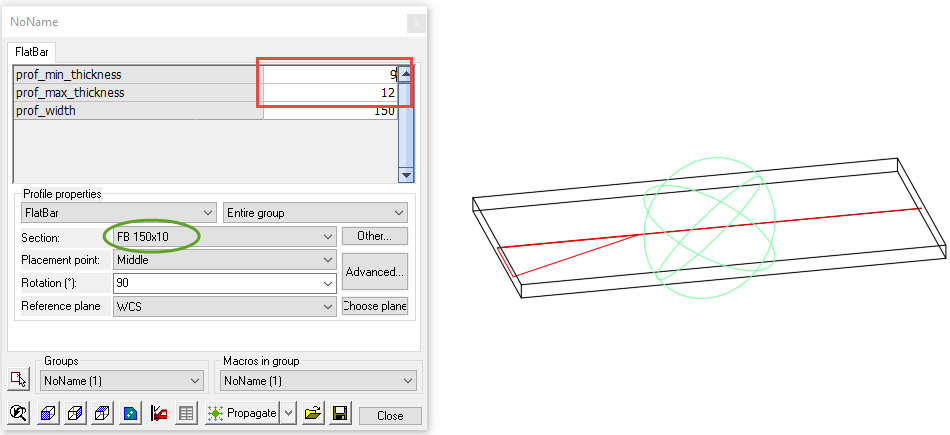
In this example we've set the minimum thickness to 9, and the maximum to 12.
As thickness 9 does not exist in the section table, the thickness 10 was chosen automatically :
Querying or changing variables inside smart structure objects
This is the syntax of the variable name that should be used for querying or changing variables inside the macros of a smart structure, or for changing the smart structure's sizes if the structure has a structure table assigned to it inside the macro's module settings:
Get_(ModuleName)_Struct_VarName
or
Sync_(ModuleName)_Struct_VarName
The module name is optional.
Each part of the variable name is explained below :
- ModuleName (replace this with an actual module name)
This modulename can be omitted when you are querying or changing structure settings in the same module as this variable.
Enter the module name here to retrieve or set the value from another module
For this to work correctly the specified module needs to be calculated before the current module. The constrainer is responsible for checking this before using this method.
Do not use spaces or other symbols in the module names, otherwise this feature will not work due to the variable name's limits. - Struct
Adding the struct syntax will allow us to retrieve or change a variable of the macro(s) inside the structure that is rigid in the module.
It is recommended to have just 1 rigid structure in the module when using this method as Parabuild will simply query the first rigid structure that it finds inside the module. - VarName
The supported variable names are all of the variable names of the macros inside the structure.
To learn all of the macro variables that are available inside a structure, you should use the REFEDIT command on the structure. When the structure is being edited, double-click on a part to see the variable names. The macro spheres that are inside a structure are always automatically hidden by Parabuild to not overburden the drawing.
Using the Sync_ method is allowed to automatically change a smart structure's size.
It is advised to have enough variables matching the table columns, so that Parabuild does not have multiple valid rows to choose from in the table. You wouldn't know which row Parabuild would pick.
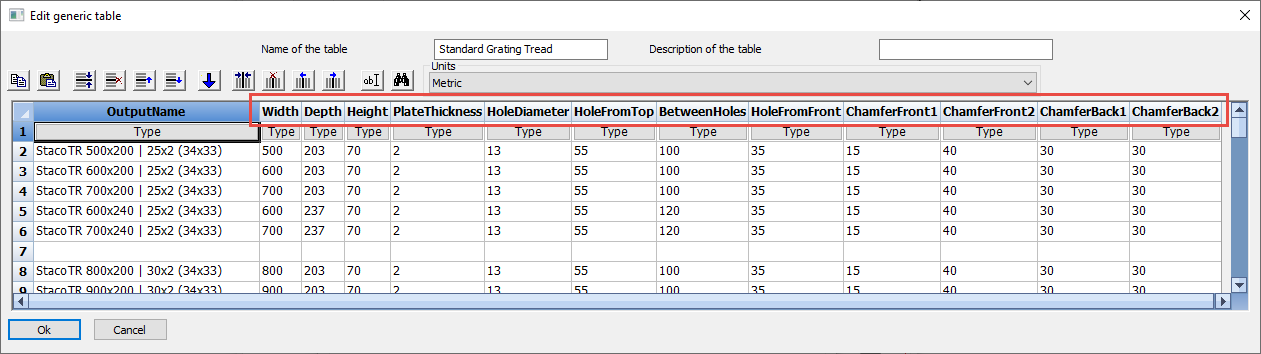
All of the valid column names of the macro tread inside the smart structure table of the standard grating tread that is included in the Parabuild installation.
Minimum and maximum
It is possible to not specify an exact size, but minima and maxima for the sizes.
The only change we need to apply is to use Struct_Min and/or Struct_Max for the variable names.
See the changing section sizes chapter for an example of this.
Querying or changing bolt settings in a bolt module
This is the syntax of the variable name that should be used for querying or changing bolt module or bolt pattern variables in the module:
Get_(ModuleName)_Bolt_(PatternName)_VarName
or
Sync_(ModuleName)_Bolt_(PatternName)_VarName
The module name is optional.
Each part of the variable name is explained below :
- ModuleName (replace this with an actual module name)
This modulename can be omitted when you are querying or changing bolt settings in the same module as this variable.
Enter the module name here to retrieve or set the value from another module
For this to work correctly the specified module needs to be calculated before the current module. The constrainer is responsible for checking this before using this method.
Do not use spaces or other symbols in the module names, otherwise this feature will not work due to the variable name's limits. - Bolt
Adding the bolt syntax will allow us to either retrieve or change a variable from the bolt module itself such as diameter or hole offset, but also bolt pattern variables such as for the bolt count. - PatternName
Specifying the pattern name is optional, and only needed when targetting pattern variables (see below).
When the module contains more than 1 flexible bolt pattern then it is recommended to also add the pattern name just before the variable name and also separated with a _
A pattern object's name can be reviewed or changed with the command PrB_SetName or PrB_PatName - VarName
The supported variable names are listed below
An example macro that uses these bolt variables can be found in the Parabuild library here : \Pb_Lib\Macros\Beam vs Beam\Clipangle vs Web.dwg
Supported bolt module settings
Example finished variables that changes a bolt module setting : Get_Bolt_BoltDiameter or Sync_Bolt_BoltDiameter
The following bolt module variable names are supported : BoltDiameter, BoltLength, BoltAddedLength, BoltMinLength, MinCylinderLength, ShopBolted, HoleDiameter, HoleOffset, HoleTolerance, BoltPartGroupOffsetStart1, BoltPartGroupOffsetStart2, BoltPartGroupOffsetStart3, BoltPartGroupOffsetEnd1, BoltPartGroupOffsetEnd2, and BoltPartGroupOffsetEnd3 - the last 6 variables allow for positioning the parts on the shaft of an advanced Bolt Assembly.
The Sync_ method is also supported on all of these variables.
You can learn more about the purpose of each bolt module variable in the Feeding excel values topic.
The following variable name is not supported here because it uses a text string : BoltAssembly. This variable can still be used for Feeding excel values or with the GetProperty and SetProperty functions in the C++/Lisp API.
Supported bolt pattern settings
Example finished variables that changes a bolt pattern setting : Get_Bolt_PatternName_Count1 or Sync_Bolt_PatternName_Count1
The following bolt pattern variable names are supported : Count, Count1, Count2, UserEntryDist, UserEntryDist1, UserEntryDist2, EntryDistRounding, EntryDistRounding1, EntryDistRounding2, IsFixedEntryDistance, IsFixedEntryDistance1, IsFixedEntryDistance2, ReversePositions, ReversePositions1, ReversePositions2, and ReversedNormal
The Sync_ method is also supported on all of these variables.
You can learn more about the purpose of each bolt pattern variable in the Feeding excel values topic.
The following variable names are not supported here because they use text strings : OffsetsAsList, OffsetsAsList1, and OffsetsAsList2. These variables can still be used for Feeding excel values or with the GetProperty and SetProperty functions in the C++/Lisp API.
Querying or changing cut constrains
This is the syntax of the variable name that should be used for querying or changing the variables of a cut constraint in the module:
Get_(ModuleName)_CutName_VarName
or
Sync_(ModuleName)_CutName_VarName
The module name is optional.
Each part of the variable name is explained below :
- ModuleName (replace this with an actual module name)
This modulename can be omitted when you are querying or changing a cut constraint in the same module as this variable.
Enter the module name here to retrieve or set the value from another module
For this to work correctly the specified module needs to be calculated before the current module. The constrainer is responsible for checking this before using this method.
Do not use spaces or other symbols in the module names, otherwise this feature will not work due to the variable name's limits. - CutName
This should be the cut constraint's name, which you can find on the Rules tab of the Edit Macro dialog box.
There is no need to add the word Cut in the variable name, but instead the cut constraint's name directly here. - VarName
Cuts can have several variables depending on the type of cut.
To see the supported variables of a particular cut, you can open the cut's settings on the Rules tab of the Edit Macro dialog box.
The available variable names are shown in the edit cut dialog and it depends on the cut type :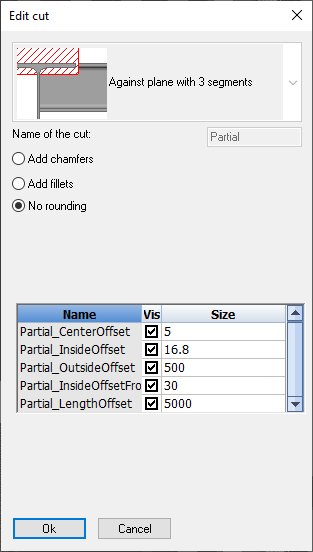
The Sync_ method is also supported on all of these variables.
Querying or changing array settings from within a macro
There are 2 very distinct ways to query or change array settings, depending on whether you want to do it from within the main macro of the array or from within the entry macros that are maintained by the array.
The main macro is the macro that constrains the common base geometry that all entry macros depend on.
Whereas the entry macros are fully maintained (copied and deleted) by the array object. But still these entry macros can query or change the array object that controls themselves.
The 2 scenarios are very different so you can find both methods explained separately below.
Querying or changing array settings from within the main macro
This is the syntax of the variable name that should be used for querying or changing array settings from within the main macro of the array, or for targeting settings of an individual entry macro:
Get_Array_ArrayName_(EntryIndex)_VarName
or
Sync_Array_ArrayName_(EntryIndex)_VarName
The entry index is only needed when targeting settings of an individual entry macro.
Each part of the variable name is explained below :
- Array
Adding the Array syntax will allow us to either retrieve or change a setting from the array.
A condition is that this variable should be created in a module of the main macro of an array. The array can then be found through the macro-array relation.
The main macro is the macro that constrains the common base geometry that all entry macros depend on. - ArrayName
Specifying the array name is required when using the Array syntax from inside the main macro.
A main macro could have several dependent arrays, hence this requirement.
The array name can be found in the properties panel of the array object :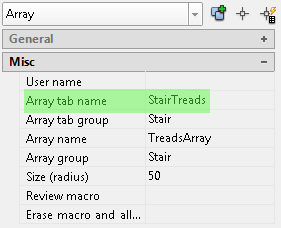
- EntryIndex
The entryIndex is required when you want to directly query or change the start position or size of a certain entry macro with any of these variables : UserEntrySize, EntryDimFixedByUser, EntrySize, and SkipEntry
Instead of the index number you can also use the words first and last here.
For variables that target the Array object itself the EntryIndex should be omitted.
For examples of this index syntax see the examples below. - VarName
The supported variable names are listed below
Examples
It is possible to target settings of the array itself from inside the main macro.
Example finished variables that targets settings of the array itself from inside the main macro of the array :
Get_Array_Arrayname_AdjustCountToFitSize or Sync_Array_Arrayname_NumEntries
It is possible to target individual entry macro settings from within the main macro when you use the syntax like this : Sync_Array_Arrayname_0_UserEntrySize.
This would change the user distance override of the first macro entry. Targetting entry macro settings that change the entry macro positions should not be done from within an entry macro itself, but rather from within the main macro.
Example finished variables that target overridable settings of a specific entry macro from inside the main macro of the array :
Sync_Array_Arrayname_first_UserEntrySize and Sync_Array_Arrayname_last_UserEntrySize
An example macro that uses these entry-specific array variables is this stair macro which can be found in the Parabuild library here : \Pb_Lib\Macros\Stairs\Stair templates on line\Stair.dwg
Inside the main macro it uses the variable Sync_Array_Stairtreads_first_Skipentry to make the first and last treads skippable for the enduser.
Supported variables
The following variable names are supported from within the main macro of an array (the entryIndex should not be added to the variable name) : Type, NumEntries, TotalLength, UserStartOffset, UserEndOffset, TotalStartOffset, TotalEndOffset, EnableRigidEntryDists, RigidEntryDistFromEntryMacro, RigidEntryDistance, RigidEntryDistanceMax, AdjustCountToFitSize, MinNumEntries, EntryDistRounding, RemainderDestination, DefaultInsertIndex, DefaultSourceIndex, AppendByAlternating, and AlternatingSourceOffset.
The following entry-specific array variables variable names are supported from within the main macro (the entryIndex needs to be added to the variable name) : EntryIndex, UserEntrySize, EntryDimFixedByUser, EntrySize, and SkipEntry
See the Feeding excel values topic to learn more about the purpose of each variable name that is available for arrays and array entries.
The Sync_ method works on all of the array variables from inside the main macro except for TotalStartOffset and TotalEndOffset, because those are readonly.
The Sync_ method is only supported from within the entry macro for these variable names : NumEntries, UserEntrySize, EntryDimFixedByUser, and SkipEntry.
The following variable names are not supported here because they use text strings : TotalDimName, EntryDimName, and EntrySizeDimName. These variables can still be used for Feeding excel values or with the GetProperty and SetProperty functions in the C++/Lisp API.
Querying or changing array settings from within the entry macros
This is the syntax of the variable name that should be used for querying or changing array settings from within an entry macro that is maintained by the array:
Get_Array_VarName
or
Sync_Array_VarName
Each part of the variable name is explained below :
- Array
Adding the Array syntax will allow us to either retrieve or change a setting from the array.
A condition is that this variable should be created in a module of an entry macro of the array.
The entry macros are fully maintained (copied and deleted) by the array object.
There is no need to enter an array name because the array will be found automatically as there can only be 1 array object that maintains the entry macro. - VarName
The supported variable names are listed below
Examples
It is possible to target settings of the array itself from inside the entry macros.
Example finished variables inside entry macros of an array : Get_Array_AdjustCountToFitSize or Sync_Array_NumEntries
It is also possible to target entry-specific array settings from within the entry macro when you use the syntax like this : Get_Array_UserEntrySize.
This would retrieve the user distance override of the current macro.
Targetting entry macro settings that change the entry macro positions should not be done from within an entry macro itself, but rather from within the main macro.
An example macro that uses these array variables is this stair macro which can be found in the Parabuild library here : \Pb_Lib\Macros\Stairs\Stair templates on line\Stair.dwg
Inside the entry macros of the treads it uses the variable Get_Array_Entrysize to display the rise of the treads to the enduser.
Another example macro is this one : \Pb_Lib\Macros\Stairs\Stair templates on line\CIP Stair.dwg
Inside the entry macros of the treads it uses the variable Get_Array_Entryindex to know whether this is the first tread, and in which case it will shorten the tread to fit with the stair's bottom.
Supported variables
The following variable names are supported from within the entry macro of an array : Type, NumEntries, TotalLength, UserStartOffset, UserEndOffset, TotalStartOffset, TotalEndOffset, EnableRigidEntryDists, RigidEntryDistFromEntryMacro, RigidEntryDistance, RigidEntryDistanceMax, AdjustCountToFitSize, MinNumEntries, EntryDistRounding, RemainderDestination, DefaultInsertIndex, DefaultSourceIndex, AppendByAlternating, and AlternatingSourceOffset.
The following entry-specific variable names are supported from within the entry macros of an array : EntryIndex, UserEntrySize, EntryDimFixedByUser, EntrySize, and SkipEntry
See the Feeding excel values topic to learn more about the purpose of each variable name that is available for arrays and array entries.
The Sync_ method works on all of the array variables from inside the entry macro except for TotalStartOffset and TotalEndOffset, because those are readonly.
The Sync_ method is not supported for entry-specific variables from within the entry macro, because this could create an insolvable loop for the array and entry macro.
The following variable names are not supported here because they use text strings : TotalDimName, EntryDimName, and EntrySizeDimName. These variables can still be used for Feeding excel values or with the GetProperty and SetProperty functions in the C++/Lisp API.
Modifying the enumeration/direction of constraints through equations
It is possible to influence the direction enumeration of constraints using variables and equations
This allows us to switch the direction of a plane without having to resort to an angle constraint or extra helper geometry.
To retrieve or change this enumeration value we have to create a variable of which the name is composed like this :
get_VariableName_EnumName or get_ContraintId_EnumName
or
sync_VariableName_EnumName or sync_ConstraintId_EnumName
We explain the different parts of the name :
- get_ : When you use get_ then the value of the enumeration will be filled in this variable by Parabuild. You should use an Adjustable or Fixed variable in this case, NOT a Flexible variable. The value will be filled in by Parabuild just before the module is calculated.
- sync_ : When you use sync_ then the value of the variable will be used to change the enumeration of the constraint . You should use a Flexible variable in this case, NOT an Adjustable or Fixed variable. The value will be filled in by Parabuild just before the module is calculated, and during calculation of the module this variable's value is calculated and pushed into the enumeration of the constraint which can directly influence the geometry.
- VariableName : the variable name in case you want to target a distance constraint
- ConstraintId : the constraint id that you want to target. This works on all constraints even those that do not have a variable name. The constraint id always remains stable except when constraints are deleted at which time the id might be reused for a new constraint. The constraint Id is listed in the rules tab (see image below)
- EnumName : The name of the enumeration which can be determined by moving the cursor over the enum buttons. This name depends on the constraint type and also on the geometry that was selected during creation of the constraint.
We explain the mechanism with the help of an example that changes the inside/outside enumeration of the chirality constraint in this image :
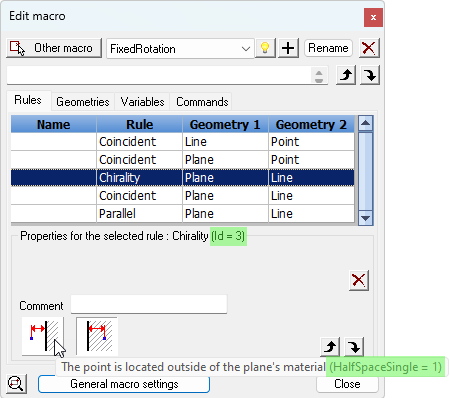
To change the enumeration we need to know a few things about the constraint. They are highlighted in the image :
- The Id number of the constraint. The constraint name such as the distance name can also be used but some constraints do not have a name, in which case we need the id number. The Id of a constraint is always displayed in the edit macro dialog box.
- The enumeration name as well as the value that you want to set. If you move the mouse over the enumeration button it will show the enum name and value of that button.
To influence the above chirality constraint the variable name and equation would look like this :
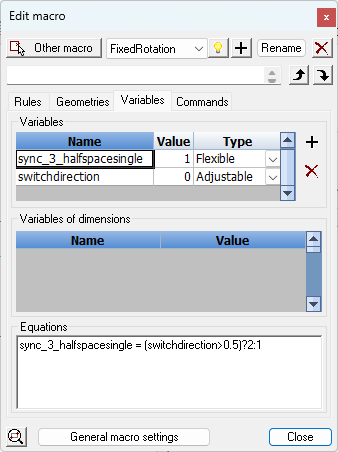
As you can see, we are using an equation to expose the enumeration to the user using the switchdirection variable which responds to 0 and 1 for a checkbox.
Note that the value of a distance constraint enumeration can range from 1 through 4.
Accessing part information or variables inside other macros
- We can access part information directly from within the module. A practical example of this is finding out whether a part is clashing or disabled, and responding to this by for example disabling the module, or any other macro behaviour that you can envision. The macro variable retrieves the information from the part, and your equation reacts to that information.
- We can now access variable values of other macros directly from within the module.
Both of these features make use of the part name which can be set on the Geometries tab : 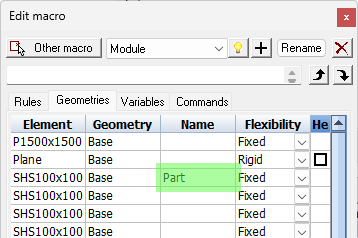
Example of retrieving filter/property information from a part
The name of the part or object that was entered in the Geometries tab can be used in variable names like this : 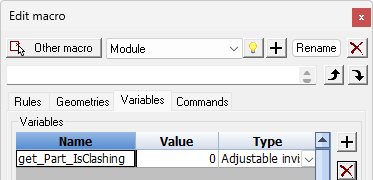
The syntax is get_PartName_PropertyName
- get_ signifies that Parabuild should try to retrieve this variable's value automatically based on the remainder of the variable name
- PartName is the name of the object from which you want to retrieve a property or filter. This name needs to be assigned on the Geometries tab.
- PropertyName is the name of the property or filter itself, and this could for example be IsClashing to get the clashing status of the part or IsContructionGeom to get whether the part was hidden inside a macro or not, or any other numeric object property.
This will work on all available filters and properties in Parabuild that return a boolean, integer, or double values but not strings.
This will work also on custom filters that you created, but in such case watch out with different installations : when the Parabuild library and the filters file in it is not copied to another installation then the macro will respond differently (the variable will not change on that other installation).
You can search for properties and queries among the Parabuild default Properties and queries or inside the Quick select dialog box which contains a more complete list that includes locally defined filters.
Example of retrieving a variable value from another macro
Such a variable could look like this :
get_PartName_Owner_ModuleName_VarName
This is the meaning of each section of the string :
- get_ signifies that Parabuild should try to retrieve this variable's value automatically based on the remainder of the variable name
- PartName : is the name of the object from which you want to retrieve a property or filter. This name needs to be assigned on the Geometries tab.
- Owner : This is a fixed word that we add so that Parabuild knows that it needs to find the owning macro of PartName
- ModuleName : This is the module name that Parabuild should find inside the owning macro. If the variable is located in the module that owns the part then you can omit this module name from the string
- VarName : This is the variable name that Parabuild should retrieve in the owning macro and module
As you can see, this feature relies on geometric dependencies to find the other macro to retrieve the variable from.
And as a consequence, we can only retrieve macro values from macros that the current macro depends on, not the other way around.
If the object is not owned by any macro (or the owning macro was deleted later on), then the variable in your module will be left untouched as is.
We are limited by the variable names for these features.
Therefore you should not use spaces, underscores, or any mathematical signs in object names, module names or filter names. In those cases this feature will usually not work.