The Variables Tab
When adding new dimension rules, we are already automatically using variables and equations.
The name of each dimension is, as it happens, is a variable.
In the value of a dimension you can also enter equations (enter for dimension A the value B: you have made the comparison A = B).
We can only add 1 equation per dimension rule and that is sometimes not enough.
This variables tab can be used if you need to add more variables and equations for doing specific intermediate calculations.
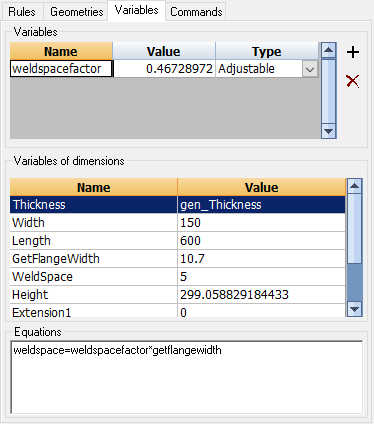
In the above example, the value of the variable weldspacefactor is calculated by the equation weldspace=weldspacefactor*getflangewidth
The variable weldspacefactor can now be used in several places (for example for the value of a dimension).
We will explore the different variables type :
- Adjustable - Use this when you want the end-user of the macro to be able to change the value of the variable in the Review macro dialog box
- Fixed - Use this when the value of this variable should be fixed at all time. So the end-user can't change the value, but the macro calculation can't change it either. This variable will be visible in the Review macro dialog box.
- Flexible - Use this when the value of this variable should not be modifiable by the end-user, but it should be calculate by the macro. It should thus be calculated by an equation. This variable will be visible in the Review macro dialog box.
- Fixed Invisible - Same as Fixed, but the variable will not be visible in the Review macro dialog box.
- Flexible Invisible - Same as Flexible, but the variable will not be visible in the Review macro dialog box.
- Adjustable invisible - Same as Adjustable, but the variable will not be visible in the Review macro dialog box.
- Adjustable degrees - Same as Adjustable, but the variable contents filled in by the macro will be converted into degrees before the value is shown in the Review macro dialog. The degrees that the user enters for this variable in the Review macro dialog will be converted into radians because macros always work in radians.
- Flexible degrees - Same as Flexible, but the variable contents filled in by the macro will be converted into degrees before the value is shown in the Review macro dialog
NOTE : Parabuild macros always use radians internally. If we want to input something in degrees, the conversion will have to be done by enabling the degrees conversion option in the variable or in the dimension rule.
Equations
There are only 2 locations where you can add equations to macros.
The first location is on the Rules tab , namely in the values field of a geometric rule.
Only the second half of the equation should be written in this field (without the '=') :
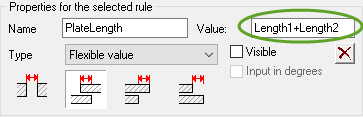
The full equation shown above is "Platelength=Length1+Length2"
The first half of the equation will always be the name of the geometric rule.
Equations can also be added in the equations field of the variables tab :

The number of allowed equations in this field is unlimited.
When adding more variables, it is possible to split up larger equations into several smaller equations to make them more readable.
Concerning the equations that are allowed
Any equation is allowed as long as it can be calculated.
You have to make sure that the variables/expressions that you use in the equation make the entire equation solvable.
Let's take for example the above equation :
weldspace = weldspacefactor*getflangewidth
In order for Parabuild to calculate weldspace, the weldspacefactor and getFlangeWidth need to be determined first.
In this case, the weldspacefactor is an adjustable variable for the end-user so that is easily determined by Parabuild.
And the getFlangeWidth variable is determined by a geometric rule with that name. So Parabuild will measure the distance of getFlangeWidth before it solves the equation.
But another equation could just as well set the value of getFlangeWidth. Parabuild is smart enough to then first solve that equation before solving this one.
If an equation contains an 'error' (for example you used a variable name that doesn't exist, or the equations chain is insolvable), then the equation will disappear from this list entirely (it will disappear the first time that the macro is calculated).
Mathematical symbols
You can use the following mathematical symbols to create equations:
- +-/*: To add, subtract, divide and multiply.
- sin() cos() tan(): Calculates the sine/cos/tangent of the value that stands between the brackets. The value between the brackets can itself be a variable or comparison.
- asin() acos() atan() : Calculates the inverted sinus, cosinus or tangent.
- () ^2: Would return the power of 2
- A % B : Returns the remainder that results from dividing A by B
- sqrt (): Return the square root
- log() : Returns the natural logarithm (base-e logarithm) of the argument
- log10() : Returns the common logarithm (base 10 logarithm) of the argument
- exp() : Returns the exponential (For example the exponential value of 5 is 148.413159)
- abs() : Returns the absolute value. So this will always strip off the minus sign of a value (-5 will become 5).
- sign() :
- int() : Returns an integer value even when the input is a comma-separated value.
- frac() :
- dtr() : Converts the degrees value into radians
- rtd() : Converts the radian value into degrees
NOTE - Internally Parabuild always works in radians. Therefore any angle variable calculated by Parabuild will always contain radian values. Care should be taken when variables are used as input or output in the Review macro dialog box.
All the dimension rules have a Input in degrees checkbox property, which activates the automatic degrees/radians conversion in the Review macro dialog box.
Also all the variables that are created in the Variables tab have an option to do the degrees/radians conversion automatically. - Conditions can be used inside equations
For example a condition could look like this :
offset = (useTopSide>0)?0:-thickness
This equation demonstrates how a switch for the position of a plate can be achieved, for example to let a plate switch from left/right side or top/bottom side.
So if the switch useTopSide is larger than 0, the displacement is 0. If useTopSide is 0, then a displacement of the thickness of the plate is applied.