Plate
The 'Plate' object type has the following headings:

General: Is common to all object types, and covers general AutoCAD and BricsCAD settings, including: Color / Layer / Linetype / Linetype scale / Plot style / Lineweight / Transparency / Hyperlink / Handle /
3D Visualization: Is also common to all object types and includes: Material.
The material that is referred to here is only the visual representation material. For changing the actual material of parts, see the Additional Data section of plates, profiles or structures.
Misc
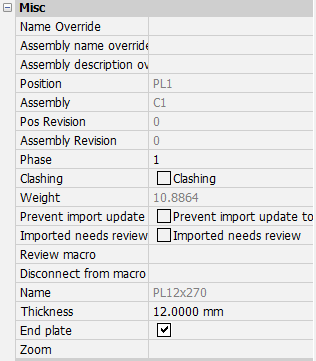
Note! - * indicates that the given value is a resultant of the sum of other values in the panel - and cannot be individually edited.
Name override: The replacement of the normal profile name. This replacement name will be used in all part lists and workshop drawings.
Assembly name/description override - This property is useful to be used in bills. These properties can be a template string combining any number of properties, such as the structural type, material, main part name, etc...
This property can also be automatically assigned using template drawings or by structural type classification.
When the property was not individually set in the properties of the part then the default template string is used for that assembly. This default can be determined by the user in the Global settings dialog box.
When neither the assembly property or drawing default was set, the name of the main part is used instead.
This property is accessible from the advanced properties dialog box for profiles, structures and volumes
The names PbColMarkName and PbMarkDescription can be used in bills and annotations to display the value of this property.
Position: * The number automatically given to elements by Parabuild. Elements that are the same, (same dimensions, holes, sections) are given the same position number. These positions are partially adaptable with prefixes and suffixes, see Number settings.
Assembly: * The Assembly number automatically given to elements by Parabuild
Pos revision: This value is automatically assigned by Parabuild. Whenever the part is created or modified, then it will get the current revision that is currently active in the Revisions manager.
Assembly revision: This value is automatically assigned by Parabuild. Whenever the assembly's parts or the distance between the parts has modified, then it will get the current revision that is currently active in the Revisions manager.
Phase: Change the project phase of the selected element
Clashing: This is set to yes or no and refers to whether the profile is currently clashing with other elements or not. This property is automatically set by the clash control, and is primarily included in properties for search objectives. For more information read the chapter Clash Check
Weight: * Calculated weight of the selected member
Prevent import update to model: Activating the checkbox will prevent any import update to the model. This refers to CIS/2 or Ifc incremental imports.
Imported needs review: This value will be set automatically for parts that were updated after an incremental CIS/2 or Ifc import.
Review macro: Will open the Macro review dialog, where the macro may be viewed and/or edited
Disconnect from macro - This action button will remove all the constraints that define this part if a macro is owning the part. The part will become an unconstrained object and will from there on behave like any normal object drawn in AutoCAD/BricsCAD. It will be possible to move, rotate and stretch the part with all of the available AutoCAD/BricsCAD commands.
Name: * This is the plate size, also shown in the BOM. Refer to the Settings dialog box for influencing this name
Thickness - This property allows you to change the thickness of the plate. This property will only work if the plate is not owned by a macro. Use the disconnect macro property in that case to change this thickness.
End plate - This enables or disabled the end-plate feature, which will trigger an extra section view on assembly shop drawings. This is explained in more detail in the Set as End-Plate topic.
Zoom: Zoom to the extents of the selected member
Representation
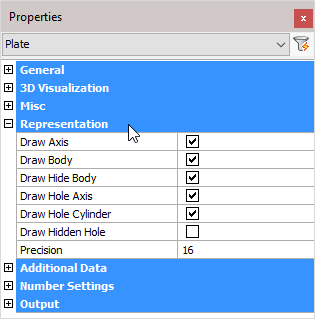
Draw Axis: Draws the Axis of a profile
Draw Body: Draws the complete 3D-model of the profile in 2D wireframe
Draw Hide Body: Draws the complete 3D-model of the profile in 3D visual styles
Draw Hole Axis: Draws the axis of every hole in the plate
Draw Hole Cylinder: Draws the cylindrical path of all holes in the plate in 2D wireframe
Draw Hidden Hole: Draws the cylindrical path of all holes in the plate in 3D visual styles.
One can activate the hole subtraction here for a better visual representation, but do note that when a bolt is drawn through this hole, you would not see the difference. On top of that, the subtraction is heavy on resources. This is the reason why this option is disabled by default.
The edges of the hole are always drawn independently of this setting.
Precision: This value applies to the precision of curves in the plate's internal or external contours.
Additional Data
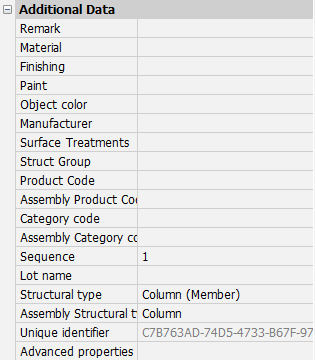
Remark: This can be used in a variety of ways. This field is maintained for every element. It has its own column in the part lists, and can be used for sorting part lists and workshop drawings. This property has no further influence
Material: This field also has its own column in the part lists and can be used for sorting, but this has a direct influence on the position number (and consequently the mark/assembly number). Two elements that are identical, but have another material assigned to, will be given another position number. This enables a total categorization of different materials in part lists and workshop drawings.
The weight factor of every material can be changed in the Parabuild Properties - Global - Material/Finishing. Parabuild will use this weight factor to calculate the weight in the part lists.
Finishing: Same as Remark
Paint: You can enter a free paint color text here, for indicating to the shop that the part needs to be painted
Object color: This property refers to the inherent color of the object. Contrary to the paint color this property does not necessary call for an action in the shop. This would be used for example when detailing and fabricating parts in FRP Material which comes in various colors.
The name PbColObjectColor can be used in bills and annotations to display the value of this property.
Manufacturer: Same as Remark
Surface Treatments: This will open the Surface Treatments dialog. It allows you to add new surface treatments or modify existing surface treatments.
Struct Group: This property can be freely used for the user's own purpose.
Product code : All volume entities including bolts have this property.
For bolts this represents the assembly product code. bolt part product codes are set in the Bolt Parts Library.
Product codes can be used to uniquely identify items that may be standardized or available off-the-shelf and have an associated code. Product codes can be proprietary formats, or they can be standardized like UPC or EAN codes.
This property is just one of the 5 ways to assign product codes to parts. Look at the Product codes topic to learn more.
The name PbColProductCode can be used in bills and annotations to display the value of this property.
Assembly product code : All volume entities excluding bolts have this property.
Product codes can be used to uniquely identify items that may be standardized or available off-the-shelf and have an associated code. Product codes can be proprietary formats, or they can be standardized like UPC or EAN codes.
This property is just one of the 5 ways to assign product codes to parts. Look at the Product codes topic to learn more.
The name PbColAssemblyProductCode can be used in bills and annotations to display the value of this property.
Category Code: The category code can be used for a number of purposes but an example is for assigning a cost category to the parts in the estimation phase.
These codes are usually determined while a quote for the project is made. This way the parts can be traced from estimation to production and to completion inside ERP/MIS software. This value is exported to KISS files. The name PbColCostCategoryCode can be used in bills and annotations to display the value of this property.
Assembly category Code: The same as category code but it assigns a code at assembly level
The name PbColAssemblyCostCategoryCode can be used in bills and annotations to display the value of this property.
Sequence: The erection sequence of the part. The sequence of a part has the following capabilities:
- The reference assembly of a bolt can be determined by the sequence number of the assemblies
- The sequence is exported to KISS file
- It should be available in bills when you make the columns : %PbColSequence%
- A planning tool for erection is a future addition
Lot Name: This is just a text field that is free to be use. Usually a lot is a collection of parts that will go on one truck.
It is intended to be used as "shipping lots", essentially to organize/indicate transport to the site
This could be used to create further sub-divisions within phases; for example to ship structural items before grating, everything related to a specific platform/stair, etc...
This value is exported to KISS files.
Structural Type: For example: Bracing/Rafter/Stringer/Handrail/Post/etc.... You can use the variable %PbColStructuralType% to use this property in Bill of materials or annotations
Assembly Structural Type: For example: Stair/Railing/etc.... You can use the variable %PbColAssemblyStructuralType% to use this property in Bill of materials or annotations
Unique Identifier: The Unique identifier is allocated by Parabuild, or received from a CIS/2 or Ifc file import. This ID is necessary for uniquely identifying parts when importing/exporting parts, so that the parts can be modified instead of being re-imported each time a new version of an Ifc file is imported. This identifier can also be used to find a part.
Advanced properties - Clicking on this button will open the advanced properties dialog, which contains the following properties for profiles :
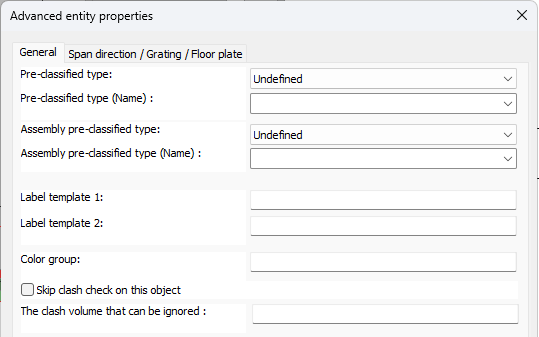
- Pre-classified type and Assembly pre-classified type - This property is only useful for template drawings of connections/macros.
This setting is a good alternative way to automatically assign structural types when it is too difficult or impossible to create filters that detect the type of part automatically.
To make this work, you first have to set the pre-classified structural type here, and then save the template drawing in the library. Then the next time when the template drawing is used and inserted into the drawing, then this pre-classified structural type will be set in the structural type property of the part upon insertion.
The purpose of this is to have an influence on the automatic assignment of the structural part type property, without having to rely on the automatic Structural types assignments through Object Filters. - Label template 1/2 - This allows us to assign per-entity unique information on annotations. How to do this is explained in the Label templates topic.
- Color group - This property can be used to group parts into color groups as an additional way to categorize the objects. The color groups are usable in filters and are especially useful to be used in the color schemas in the Visibility manager.
This property is accessible from the advanced properties dialog box. This property is available to macros, arrays, bolts, plates, profiles, structures, and volumes. - Skip clash check on this object - When this option is enabled then the object will not take part in the clash checking routine. Care should be taken when using this function because failure to erect the structure may occur if clashing elements are allowed. This property was only created for cases like flat bars or round bars being used for bracings. These well bend when erected but drawing this bend in the 3D model just to prevent the clash detection is quite cumbersome.
This property is accessible from the advanced properties dialog box for plates, profiles and volumes. For bolts it is available directly on the properties panel. - The clash volume that can be ignored - Enter the volume that the clash control should ignore when the object is clashing with another object. If the clash volume is smaller than the given volume then the objects will not clash. If the volume is larger then the objects will be designated as clashing.
The span direction / grating / floor data properties on the separate tab are explained below : 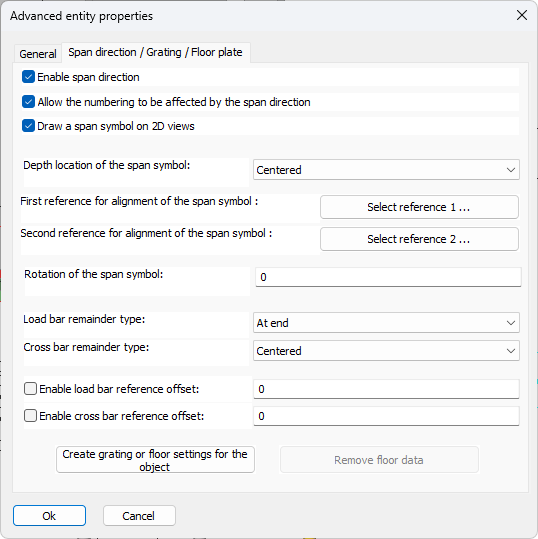
 Span direction
A span symbol can be activated for plates to indicate a certain direction on the workshop drawing. The span direction can be used to determine the load bearing direction of grating and floor panels, grain direction for wood, or the direction of fibers in fiber reinforced plastics.
This tool can also be used to influence the orientation of the coordinate system of a plate without adding the span symbol on the shop drawings.
The short leg of the plate's triangle (ECS) shows the span direction in 3D (or load bearing/grain/fibers direction).
The span direction tool has the following options :
Allow the numbering to be affected by the span direction - When this is enabled, then the plate will receive a different part number from than plates if their span direction differs, even if the rest of their geometry is the same.
Draw a span symbol on 2D views - When this is activated the span symbol will also be shown on 2D views
Depth location of the span symbol - The available options are Centered, Top face or Bottom face. This depth is not visible on the plate in 3D but it does have an effect on the span symbol on the 2D view. The span symbol will be drawn on the specified depth of the plate. When the above setting Allow numbering to be affected... is enabled and the value is not centered then this setting will also affect the numbering sensitivity of the plate.
First/second reference for alignment of the span symbol - The reference geometry for the span symbol can be chosen, and additionally an angle.
When a second reference is chosen then the span symbol's alignment will be in between the 2 reference alignments that were chosen.
Only a geometry on the plate itself is allowed. See examples below.
Rotation of the span symbol - Here we can specify an angle witch which we can rotate the span symbol relative to the reference geometry(s).
Number Settings

Pos Prefix: Determines the prefix of the position number.
Pos Suffix: Determines the suffix of the position number.
Pos Start number: Determines the start number of the position number.
Pos preferred number: Forces Parabuild to use the preferred number as position number. Parabuild will comply if this number is not already in use by a different part.
Assembly Prefix: Determines the prefix of the Assembly/Mark number.
Assembly Suffix: Determines the prefix of the Assembly/Mark number.
Assembly Start number: Determines the start number of the Assembly/Mark number.
Assembly preferred number: Forces Parabuild to use the preferred number as assembly/mark number. Parabuild will comply if this number is not already in use by a different part.
Remove Pos & Mark number history: Lets Parabuild forget the preferred numbers and also the previous numbers that the part had.
Note! For more information on any of these items, refer to Numbering of elements
Output
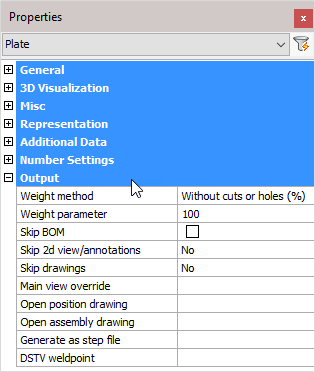
Weight method:
- Without cuts or holes (%): The weight of the complete length of the profile will be calculated, without subtracting the holes and cuts. In the next property you can adjust the percentage of this value that should be used.
- Cut: The cuts in the profiles are subtracted to calculate the weight.
- Cut and drilled: The cuts and the holes are subtracted to calculate the weight
- Fixed value: The value you enter in the next property will be used as the weight for this element in kg or lbs (This value will be taken over in the BOMs without any adjustments).
Weight parameter: This property is being used in combination with the above properties ‘Default’ and ‘Fixed value’
Skip BOM: If this property to ‘Yes’, this element will not appear in the BOMs
Skip 2D view/annotations: Adjust this to skip this element for the 3D annotations or the 3D annotations + 2D view
Skip drawings: You can skip only the Pos drawings, only the mark drawings, or both the Pos and Mark drawings
Main view override: Select a plane that determines the main view's direction
Open position drawing: Will open the position drawing of the selected part
Open assembly drawing: Will open the assembly drawing of the selected assembly
Generate as a STEP file: STEP file is a CAD file format, usually used to share 3D models between users with different CAD systems. Note! This command will only work in BricsCAD and when the Communicator module is installed and licensed. For more information, refer to Document generation Settings > Generate STEP Files
DSTV weld point: DSTV weld points are points that are placed in the automatically produced DSTV NC-files. A point indicates on which spot an element must be welded on the profile. For more information, refer to parabuild Settings > Global > DSTV Weld points