Print (all) sheets
These tools allows you to print all of the sheets to a device or to PDF files
Before the actual print is executed, Parabuild will first ask whether the shop drawings should be refreshed or not.
This is advised to ensure that the number of parts in the bill of each sheet corresponds with the actual parts in the 3D model.
During this process, it will warn you in case you're about to print an expired drawing.
After that the command will ask whether you want to clone and filter the sheets before printing them.
Both of these questions may be obtrusive to some users which is why they can be disabled in the General output settings.
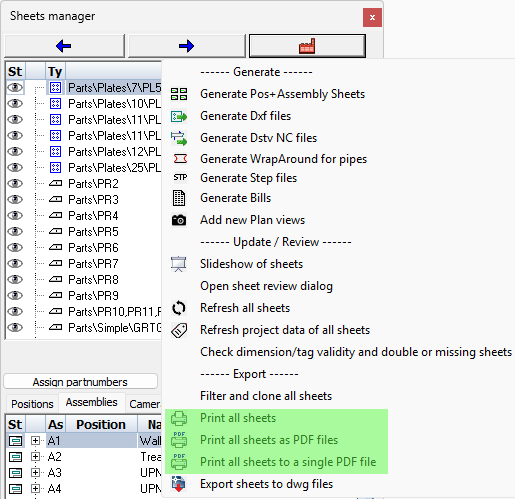
There are 3 print versions each of which are explained below :
1. Print all sheets
This is for printing to one of the windows or AutoCAD/BricsCAD devices.
The print settings dialog box will be shown to allow you to set the device and media. This dialog box is explained below.
2. Print all sheets as PDF files
This is for writing a PDF file per sheet.
The print settings dialog box will be shown to allow you to set the media. This dialog box is explained below.
3. Print all sheets to a single PDF file
This is for printing all sheets merged together in a single PDF file. No print dialog box is shown but none is needed either.
You can change the CTB file that needs to be used or the standard filename to which to write in the General output settings.
Print/Publish settings per format
The print dialog will be prompted once per format that is being used by the sheets in the print selection.
This allows you to assign a different device and media per format size, among other things.
This dialog allows us to choose between printing and publishing modes.
Printing works much the same as manually printing a layout. But to make this work Parabuild has to do the following process serially : open a sheet, print to the correct format, close the sheet, open the next sheet, etc...
Publishing works differently : Each sheet that needs to be printed is prepared and stored separately as a dwg file, after which each dwg file and it's layout are sent to the publish mechanism in AutoCAD/BricsCAD. This method keeps the current 3D model out of the printing process which makes the printing process more consistent. This method also allows the sheets to be printed in the background while you continue your work in the 3D model.
There are several differences in options when you choose Print vs Publish, so below the options are explained for both scenarios separately.
Publish settings per format
The options for the Publish method are explained hereafter :
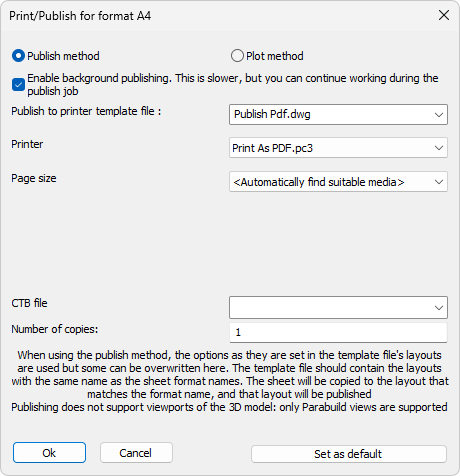
Enable background publishing - Enable this to continue working on the 3D model while the publish process is done in the background. This setting influences the AutoCAD/BricsCAD variable BACKGROUNDPLOT values 2 and 4
Publish to printer template file - When publishing to a printer device, Parabuild needs to use this template drawing that is empty except for pre-created layouts.
The template drawing is used again for each sheet that is published. The sheet that is to be written to Pdf will be inserted into this template drawing, on the layout that has the same name as the sheet's format name.
So the template file needs to contain the same amount of layouts as there are formats in Parabuild, and the layout names need to exactly match the format names in Parabuild, otherwise the publish will not work for all formats.
The device and media name that are set in the layout inside the template will be used except if the user overrides them during the publish action. That is also why we can use the Publish Pdf template for publishing to a physical printer : the device name is overridden with a local printer name chosen by the user in the print tool at the last moment before the publish action is started.
The publish template file that is included in the Parabuild installation was configured for all default formats so this template can be used as a basis to create your own custom template with different print options or formats if that is needed.
It would be possible to create your own printer template file in which the device names and media names was pre-configured in each layout inside the template file. However, the device name can be different on each machine while the template file is located in the Parabuild library which can be used on different machines.
We would advise against this workflow and instead override the device name in the print tool's dialog box, which also allows saving the device name as default. In the print tool's dialog box the default that you save there is saved locally on the computer, which is perfect for printing to a device!
Printer - This contains the device name such as a physical printer, or a PC3 file for writing PDF files for example.
The default value here is <Use device as set in template>, which should generally be left untouched when you want to print to Pdf file(s).
But if you want to print to a physical device then you can choose the device here. Parabuild will change the device in the layout of the template file for you.
Page size - Choose the page size if you want to override the page size that was pre-set inside the template file. Besides the sizes that the device has, the following options are also available :
<Use media as set in template> This is the default option. The template's media will not be touched if you use this. However if you have overridden the device name in the previous setting then this value is not valid and Parabuild will automatically search for a suitable media if you chose this option.
<Automatically find suitable media> Choosing this option will prompt Parabuild to automatically search for a media size of the device that best matches the format size of the sheet.
CTB file - this file is used to match the color of entities to the desired line thicknesses on the printed sheet, or to change the print color scheme entirely.
The file PbColor.ctb provided in the default Parabuild installation will not change the colors that you see on screen, but it will make the model lines a little thicker than all other lines
The file PbBlack&White.ctb provided in the default Parabuild installation will convert all colors to black
Number of copies - This option will only be in effect when you are printing to a physical device as opposed to printing to a file
Set as Default - Press this button to save the current configuration as the default for all future print sessions. The default is only saved for the current format size. Note that there are 2 different sets of print configurations saved : a set for all print actions to a device (this is called "Print" throughout Parabuild), and another set for all print actions to Pdf (this is called "Print to Pdf' thoughout Parabuild)
Print settings per format
The options for the Print method are explained hereafter :
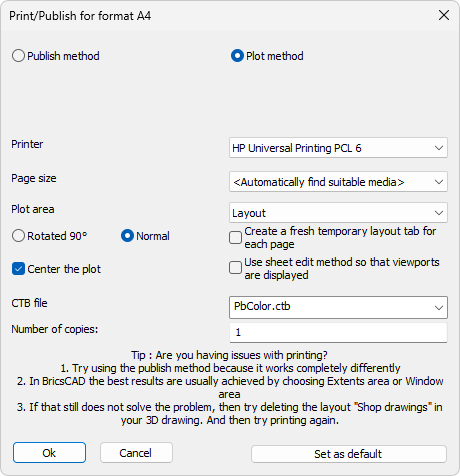
Printer - This contains the device name such as a physical printer, or a PC3 file for writing PDF files for example.
Page size - Choose the page size here. Besides the sizes that the device has, the option <Automatically find suitable media> is also available. Choosing this option will prompt Parabuild to automatically search for a media size of the device that best matches the format size of the sheet.
Plot area - You can choose between Extents, Layout and Window. This is the same options that AutoCAD/BricsCAD provide for the plot area of a layout. The option Layout can be used when the sheet has objects drawn outside of the format size and you do not want those objects to be printed.
Rotated 90° / Normal - This option refers to the Portrait/Landscape option that exists in AutoCAD/BricsCAD. But note that this option will be decided automatically when the page size <Automatically find suitable media> is chosen.
Center the plot - Use this to center the sheet in the middle of the media size.
Create a fresh temporary layout tab for each page - When enabled, Parabuild will create a new layout tab for each sheet, and will delete the layout tab after the print was finished. This option was introduced to reduce the amount of inconsistent prints. But we recommend the publish method for best print results as that method does not work in a serial manner inside the 3D model like regular printing does.
Use sheet edit method so that viewports are displayed - Enable this option if you want regular AutoCAD/BricsCAD layout viewports to be displayed correctly on the print. One could use these viewports on GA sheets to display a view of the 3D model in realistic visual styles or even in perspective if you wish. This option is not yet possible in combination with the publish mode due to the way publishing works.
CTB file - this file is used to match the color of entities to the desired line thicknesses on the printed sheet, or to change the print color scheme entirely.
The file PbColor.ctb provided in the default Parabuild installation will not change the colors that you see on screen, but it will make the model lines a little thicker than all other lines
The file PbBlack&White.ctb provided in the default Parabuild installation will convert all colors to black
Number of copies - This option will only be in effect when you are printing to a physical device as opposed to printing to a file
Set as Default - Press this button to save the current configuration as the default for all future print sessions. The default is only saved for the current format size. Note that there are 2 different sets of print configurations saved : a set for all print actions to a device (this is called "Print" throughout Parabuild), and another set for all print actions to Pdf (this is called "Print to Pdf' thoughout Parabuild)