Template settings
This dialog box can be opened by clicking on Settings in the Sheets manager and in that dialog clicking on the Drawings tab, and under that the sub tab called Sheets :

In this dialog we can choose the standard drawing sheet templates.
It is possible to personalize the templates to reflect your company's or clients identity.
To do this, you can open and modify these template .DWG files in the Parabuild directory: Parabuild\Pb_Lib\Workshop drawings\
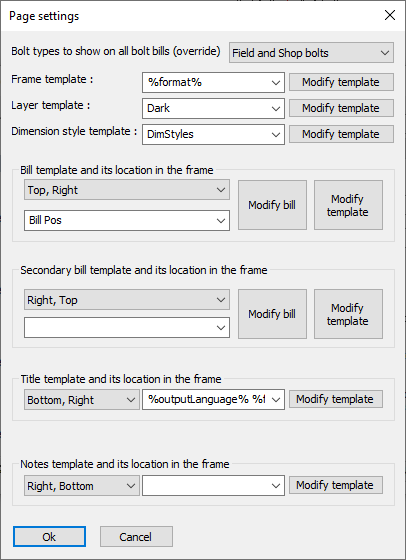
In this dialog box you can change the following settings :
Bolt types to show on all bolt bills (override) - If there are bolt bills active on the drawing, then this option will determine which types of bolt will be listed in those bolt bills. The inserted bills also have this setting so that means that the setting of the inserted bill will be overridden by the setting that you choose here.
Frame template - By default, this is set to %format%. It is important to understand why this variable is being used and be sure what you are doing before changing this to something else. The frame template to be used is depending on the format. As the format is chosen automatically by Parabuild, we can't enter an actual format here but we use the format variable to automate the frame template selection.
The files that Parabuild presents here are located here in this folder in the library : \Pb_Lib\Workshop drawings\Sheet Templates\
You can use the Modify template button to directly open the drawing template file, so that you could do manual modifications to the template file. This page settings dialog will be closed to make it possible to open the drawing file.
Layer template - Here you may switch the layer template from light to dark. Both templates were created to accommodate users working with a light background while others prefer to use a dark background for sheets. Do note that the layers are usually only inserted the first time per 3D drawing. After the first time, the layers exist already and they are not overwritten.
The files that Parabuild presents here are located here in this folder in the library : \Pb_Lib\Workshop drawings\Layer Templates\
You can use the Modify template button to directly open the drawing template file, so that you could do manual modifications to the template file. This page settings dialog will be closed to make it possible to open the drawing file.
Dimension style template - The dimension styles in this template drawing will be inserted in the current 3D drawing, so that the styles can be used for dimensions on the 2D drawing.
The files that Parabuild presents here are located here in this folder in the library : \Pb_Lib\Workshop drawings\Dimstyle Templates\
Bill template and its location in the frame - This is the main bill that contains the list of all parts on the 2D drawing
The files that Parabuild presents here are located here in this folder in the library : \Pb_Lib\Workshop drawings\Bill Templates\
- You can use the Modify bill button to directly edit this bill's table settings. This will open the Bill Formatting dialog box so that you can directly modify the columns and sorting of the bill table in the drawing file. This will modify the drawing file in the background for you.
- You can use the Modify template button to directly open the drawing template file, so that you could do manual modifications to the template file. This page settings dialog will be closed to make it possible to open the drawing file.
Secondary bill template and its location in the frame - This is a secondary optional bill. It is used most often for listing all of the field and/or shop bolts are linked to the parts on the 2D drawing.
The files that Parabuild presents here are located here in this folder in the library : \Pb_Lib\Workshop drawings\Bill Templates\
- You can use the Modify bill button to directly edit this bill's table settings. This will open the Bill Formatting dialog box so that you can directly modify the columns and sorting of the bill table in the drawing file. This will modify the drawing file in the background for you.
- You can use the Modify template button to directly open the drawing template file, so that you could do manual modifications to the template file. This page settings dialog will be closed to make it possible to open the drawing file.
Title template and its location in the frame - The title blocks of the sheet can be personalized by opening the drawings in the folder : \Parabuild\Pb_Lib\Workshop drawings\Title Templates\
The default value is "%outputLanguage% %format%", which could result in for example "English A4". So in that case the file "English A4.dwg" will be used in the Title templates folder.
Both strings can variate when a new sheet is created, so therefore the variables are necessary.
If the user works for several contractors that each want their own logo on the title block, then this can be accommodated by using the variable %Contractor_Name% in this field.
This variable can be entered in the Project data of the 3D drawing.
For this to work, the user will also have to create the title blocks here by creating the title block files here with the contractor name in the dwg filename.
You can use the Modify template button to directly open the drawing template file, so that you could do manual modifications to the template file. This page settings dialog will be closed to make it possible to open the drawing file.
Notes template and its location in the frame - The notes is an extra template that can be used to freely add more information on the sheet.
The files that Parabuild presents here are located here in this folder in the library : \Pb_Lib\Workshop drawings\Notes Templates\
You can use the Modify template button to directly open the drawing template file, so that you could do manual modifications to the template file. This page settings dialog will be closed to make it possible to open the drawing file.
More about frame templates
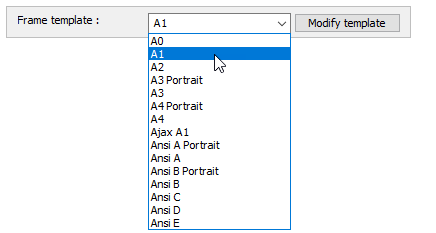
These template files are located in the folder \Parabuild\Pb_Lib\Workshop Drawings\Sheet Templates\
The overall size of the templates will match with the size of the standardized ISO or ANSI sheets.
Should you wish to create a non-standard template, then you can add a new frame template here, but don't forget to also add the accompanying format in the Format scales dialog.
More about Title Templates
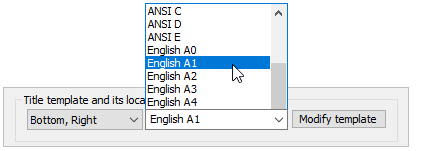
These template files are located in the folder \Parabuild\Pb_Lib\Workshop Drawings\Title Templates\.
You can add or delete text fields, rename the fields, rearrange them, and add your own or the companies identity in the form of a logo.
For performance reasons we recommend that you draw the logo with AutoCAD/BricsCAD native objects such as lines and hatches if this is possible.
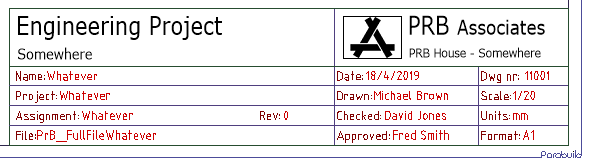
A typical edited title block with fields added, together with the company logo
The variables that are used by these title blocks can be set in the Parabuild General / Project data dialog :
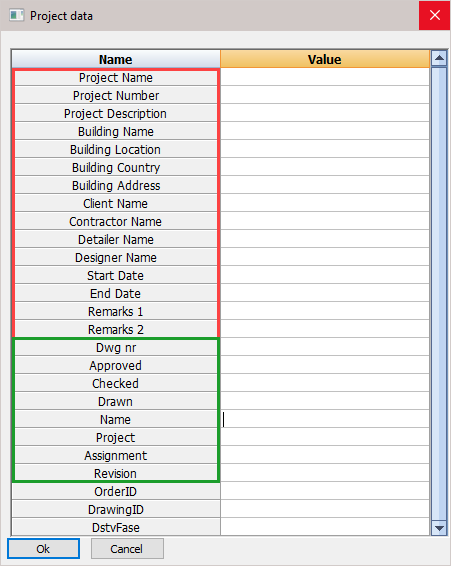
Each row first contains the title header and then the variable - e.g. Project Name : Name
By entering the appropriate values adjacent to the Project Name will substitute the variables in the title block template.
The first 15 variables in this dialog are fixed and always there, no matter what the title blocks contain.
These 15 fields are used not only for filling title blocks in sheets, but also for writing project data to KISS format files for example.
These 15 fields will work across all languages. If you would change the Parabuild language then the field values will stay intact.
These are the 15 variables that Parabuild recognizes (red) :
- Project_Name
- Project_Number
- Project_Description
- Building_Name
- Building_Location
- Building_Country
- Building_Address
- Client_Name
- Contractor_Name
- Detailer_Name
- Designer_Name
- Start_Date
- End_Date
- Remarks_1
- Remarks_2
In the below image, the fixed fields are indicated in red.
When using these fields in a title block text object or in a block attribute, it is possible to use the text "Project Name" or "Project_Name". Parabuild will replace the variable name with the actual project value when a sheet is created or updated.
The dynamic fields are indicated in green. These data fields can be added freely.
The dynamic fields can be added by simply typing them in the text field in a title block that is on the layer named "Pb_TracTitleSetting", and saving the dwg file. The text field that you use in the title block will become the project data name.
When you open the Project data dialog box, all of the title blocks that start with the current language (English*.dwg) will be loaded and all text fields are analyzed. The non-standard fields are then also added to the list of fields inside this dialog box.

Other variables to be used in sheet titles and frame templates
The following variables are specific to sheets and can also be used in the sheet templates :
|
Name |
Description |
|
PrB_FullFilename |
This will show only the sub folder and the sheet name. The sub folder is local relative to the folder where the 3D dwg file of the project is stored |
|
PrB_SheetName |
This will show only the sheet name. This is also the filename that the sheet would get when it is exported as a PDF or 2D dwg file |
|
PrB_3DFoldername |
This will show only the folder where the dwg filename of the 3D project is stored |
|
PrB_3DFilename |
This will show the folder and filename of the dwg filename of the 3D project |
|
PrB_Date |
This will show the day of creation of the sheet |
|
PrB_Time |
This will show the time of creation of the sheet in hours and minutes |
|
PrB_ScaleColon |
This will show the scale of the sheet like this : 1:10 |
|
PrB_Scale |
This will show the scale of the sheet like this for a metric project : 1/10 and like this for an Inches project : 1:10 |
|
PrB_Unit |
This will be 'mm' or 'Inch' depending on the 3D project unit |
|
PrB_Format |
The format name of the sheet |
Annotation variables and part properties
Finally we can also use all of the annotation variables and part properties in the sheet templates.
You only have to add a % before and after the variable name.
This will work very similar to how the annotations work but know that Parabuild will want to show the value of all the parts on the sheet.
For example when you have a part shop drawing of a member that occurs 4 times in 3D, but with different paint descriptions, then you could get this result :
This example has the following assumptions :
- 2 members have paint set to Red
- 1 member has paint set to Yellow
- 1 member has paint set to nothing (an empty paint property)
Then the property %PbColPaintColor% when used in one of the sheet templates will be replaced with : 2xRed;1xYellow
The member with an empty value will be ignored here but not in the bill of materials.
The counting that is done here also takes into account any Sheet filtering that may have been set such as the filter on a certain phase.
More about Bill templates

These template files are located in the folder \Parabuild\Pb_Lib\Workshop Drawings\Bill Templates\.
The column titles are normal texts inside a table object. Just double-click a text field to edit them.
The first row is always the titles row.
The second row is used for filling the bill.
You can change the color, text style, text height and column widths of each field.
You can add or delete columns or rows, rename rows, and rearrange them all with the BricsCAD/AutoCAD table tools.
The column headings are variables and will be replaced with their values in the bill. For a list of available variables go to Plates / Members / Assemblies / GA Views / Settings for objects on the page / Show all properties

The sorting of the rows and the totals row are adjustable by using the command PrB_BillTableSettings or by right-clicking on the view :

The table bill settings dialog looks like this :
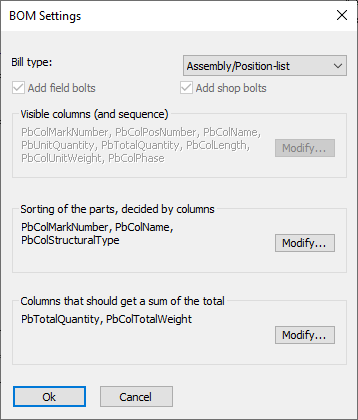
The Bill type will determine the types of objects that will be fed into the table.
The visible columns are only shown as information, because they are entered in the table as text.
The Add field bolts and Add shop bolts are extra filters only available for bolt bills. You can optionally filter one of the bolt types from the table. Do note that the same filter option already exists in the Page settings dialog and it works as an override of this setting. See above in this topic, the setting is called Bolt types to show on all bolt bills (override).
You can use the other buttons to change the columns on which the sorting of rows will be done, and also which columns should get a total field on the last row.